TABLE OF CONTENTS
Overview
When configuring a Commerce Connector Data Exchange, administrators can map fields visually using the available YAML editor. With each exchange, there is base processing code (processor file) that handles the native transformation logic for data exchanges. In some scenarios, complex or custom transformation logic is needed to ensure proper data import into Znode or export into other business systems.
Introduction to Custom Processor Files
The Commerce Connector application can be configured with source and destination endpoints to transfer data between them. The data is fetched from the configured source and exported to the destination according to the mapping.
Each Data Exchange can be configured with its own CustomProcessor.cs file to handle system-specific logic during import/export.

The Custom.API solution allows users to introduce custom logic using Custom.Libraries.DataExchange. This library ensures that the data is processed each time the data exchange is triggered.

The customization logic for a data exchange executes after data is imported and the exchange is triggered. Upon successful data transfer, the customized data is then exported to its destination.
This approach permits a data exchange to be customized with minimal coding requirements and without introducing future breaking changes within Commerce Connector.
Implementing a Custom Processor
Step 1:
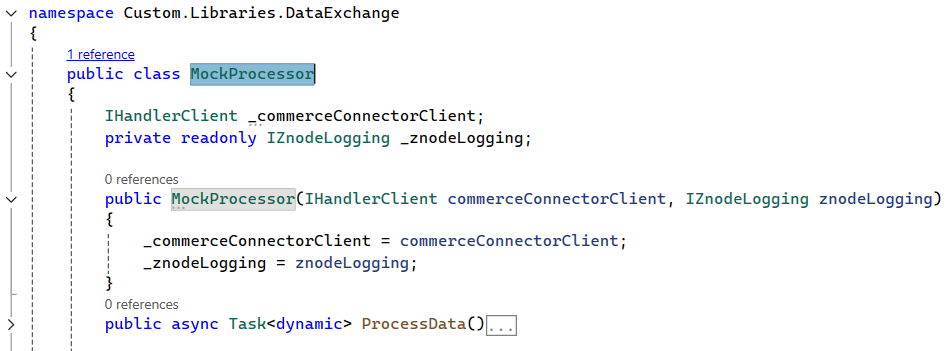
In the Custom.API solution, create a new class named MockProcessor within the Custom.Libraries.DataExchange library.
Define and initialize the IHandlerClient and IZnodeLogging fields in the constructor.
Implement the customization logic within a ProcessData method.
Step 2:
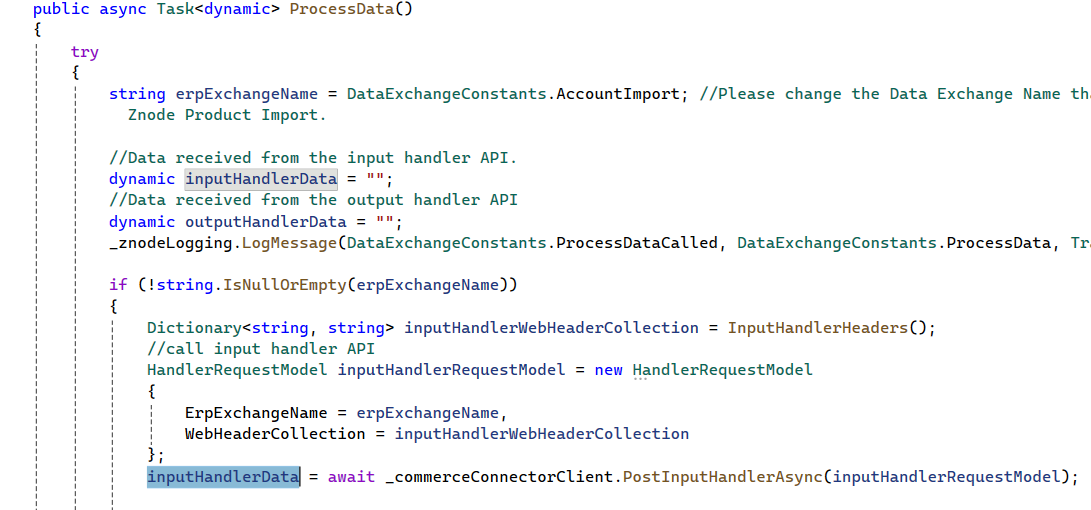
The input data is read from the source object using the _commerceConnectorClient object.
To retrieve data from the source, invoke the _commerceConnectorClient.PostInputHandlerAsync() method. This API returns data that has been parsed according to the YAML configuration of the data exchange.
The HandlerRequestModel—which requires exchangeName and WebHeaderCollection—must be provided to trigger this call.
The Inputhandler.PostInputHandlerAsync() method is expected to return one of the following:
HTTP 200: Returns the Object property, which contains the actual response data.
HTTP 500: Throws a ZnodeException indicating an internal server error.
ZnodeException: Throws a ZnodeException with a specific, informative error message.
Step 3:
To customize the received data, add your logic. Use the _commerceConnectorClient.PostOutputHandlerAsync() method to send the processed data to the destination.
This method requires a HandlerRequestModel, which includes the exchangeName, processedData, and the WebHeaderCollection.
The expected returns from Inputhandler.PostOutputHandlerAsync() are:
HTTP 200: Returns the Object property (the actual data from the response).
HTTP 500: Throws a ZnodeException indicating an internal server error.
A ZnodeException with a specific, appropriate error message.

Step 4:
Build the Custom.API solution after the ProcessData() function is finished.
The following are the expected responses:
HTTP 200: Indicates successful execution, with the response body returning data as a Boolean type.
HTTP 400: The request contains invalid data.
HTTP 404: The server cannot find the requested resource.
HTTP 500: Indicates that an error occurred on the server.
Note: An HTTP 500 status code can also indicate a successful request execution where the response body does not contain any data.
Step 5:
Launch the Znode Admin Console and navigate to the Commerce Connector > Manage Data Exchanges page.
Step 6:
Create a Custom Data Exchange. Enter the required information including the custom processor name in the “Processor File Name” field. Save the data exchange.

Step 7:
Provide the remaining configurations for the data exchange: Scheduler Configuration, Source Configuration, Destination Configuration and Mapping details. Read the Configuring Data Exchanges article for more information.

Step 8:
Trigger the data exchange to test. Review data exchange logs for details.
