TABLE OF CONTENTS
- Introduction
- Integrating Znode with Power BI
- How to Download the Znode10 Power BI APP
- How to Configure the Znode Power BI Report
- How to Configure Reports in ZnodeAdmin
- How to Update to the Latest Znode Power BI Report Version
- Power BI Configuration Settings
Introduction
This article provides a comprehensive guide for downloading the Znode Power BI Report template from Microsoft AppSource (Marketplace) and configuring it with ZnodeAdmin from the client’s workspace. It also introduces the Znode Power BI connector, which enables seamless access to the Znode eCommerce database for reporting and analytics. By following the steps outlined, users can integrate Znode data into Power BI dashboards, leverage prebuilt reports and datasets, create custom visualizations, and once published, have these dashboards automatically appear in Znode for informed business decision-making.
Integrating Znode with Power BI
Prerequisites
- Licensing
- Power BI Pro or Premium for sharing and collaboration.
- Power BI Embedded licensing for embedded analytics.
- Microsoft 365 services.
- Infrastructure
- Znode platform on a compatible SQL database.
- Optional Azure services (e.g., Azure Data Factory or Azure SQL Database) for scalability.
- Connectivity
- Network connection between Power BI and the Znode database or APIs.
- User Access
- Use Azure Active Directory (AAD) for authentication and permission management.
How to Download the Znode10 Power BI APP
- Log in to PowerBI.com.
- Navigate to Apps and click on the Get Apps button.
- Search for the Znode10 Power BI app and click on Get it now to install.
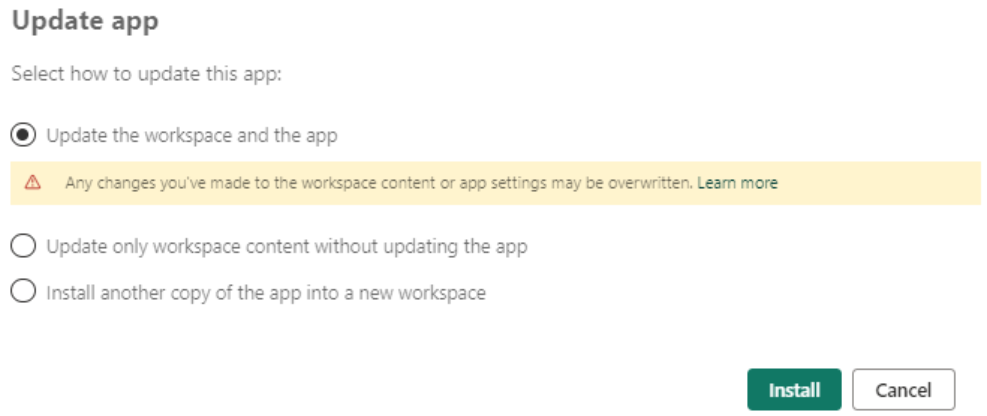
- If the app is already installed in your workspace:
- Select the option to Update the workspace and the app to ensure you’re using the latest version.
How to Configure the Znode Power BI Report
- After installation, the app will appear under the Apps tab.
- Click on the app and then the Edit icon.

- This will redirect you to the Power BI workspace.
- Click on the More options (three dots) for the semantic model.

- Then select the Settings option.
- Configure the API details in the parameters section, which allows the report to fetch data.
- Parameters to Configure:
- Domain URL: Enter the URL where Znode APIs are hosted.
- Client Name: Provide the ClientName.
- Client Key: Enter the ClientKey.
- Page Size: Define the data chunk size retrieved via APIs.

- Enable Scheduled Refresh:
- In the semantic model’s settings, enable the schedule refresh option.
- The refresh option will appear directly below the parameter settings.
- Set the time zone, frequency, and apply changes.

- Navigate to the workspace and click the refresh icon for the semantic model.
- Note: Refresh time depends on the dataset size and system resources. Initial load durations may vary due to Power BI limitations.
How to Configure Reports in ZnodeAdmin
- Open the report in the Power BI workspace.
- From the report URL, extract the WorkspaceId and ReportId.
- Example URL:
- https://app.powerbi.com/groups/{WorkSpaceId}/reports/{ReportId}/ReportSection
- https://app.powerbi.com/groups/2a2d2b6f-28f4-4ff5-b00b-44e9febda2d2/reports/89a44e64-0125-4aa9-ac35-3f282a96023f/ReportSectione45d27c76a1c93d632b1?experience=power-bi

- Retrieve the Application ID and Tenant ID from the Azure Portal.
- In Znode Admin, navigate to: Dev Center >> Power BI Settings >> Power BI Configuration Settings tab.
- Enter the following:
- Application ID
- Tenant ID
- WorkSpace ID (Group ID)
- Azure Portal Username and Password

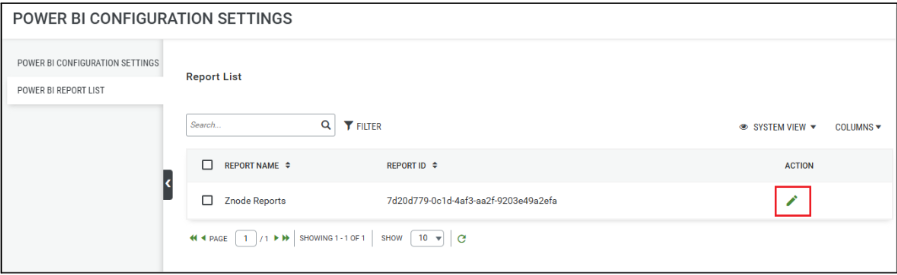
- Under Power BI Report List tab, edit the report settings:
- Insert the Report ID extracted from the URL.
- Insert the Report ID extracted from the URL.
- Once configured, the reports will be available under Znode admin > Reporting > BI Reports > Power BI Reports > View Reports (Action) > Znode Reports.

How to Update to the Latest Znode Power BI Report Version
- Navigate to AppSource or use the production link to find the latest version of the Znode Power BI Report.
- Click Get App and select the Update the workspace and the app option.
Important Note: Any customizations in the existing report will be lost during an update. To preserve them, create a copy of the report and apply changes there.
Power BI Configuration Settings
- Navigate to: Dev Center >> Power BI Settings >> Power BI Configuration Settings tab
- Add the required information in the fields.
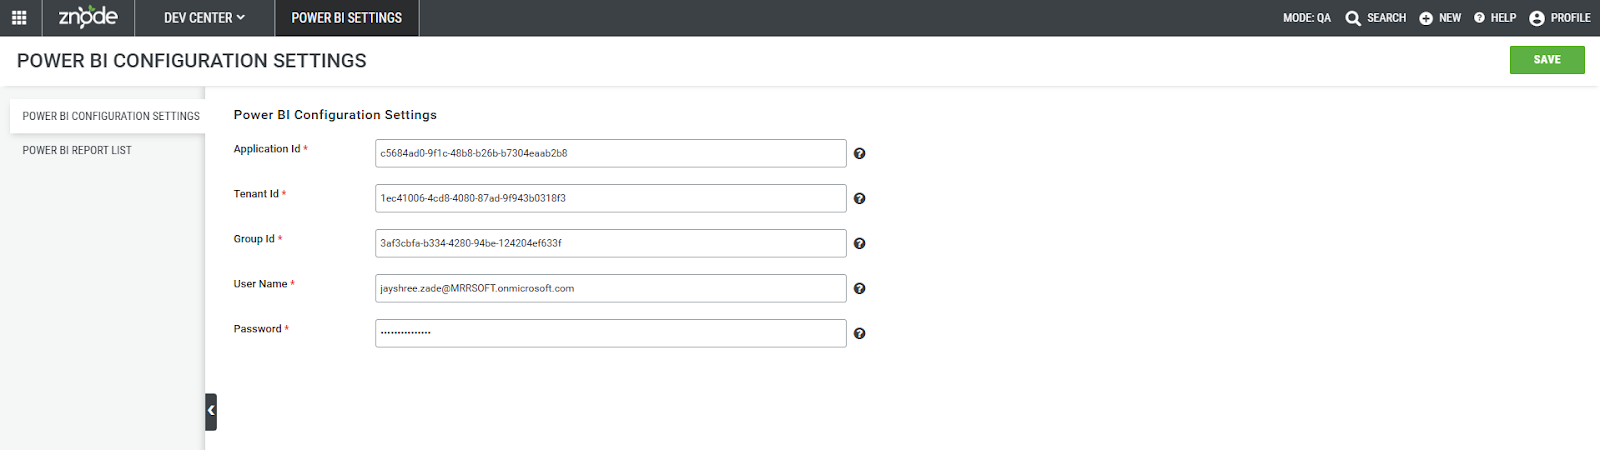
| Field Name | Description |
| Application Id | This is the unique ID that allows the Admin console to access Power BI rest APIs. |
| Tenant Id | This is the unique ID of the Azure Active Directory (AAD) where the application is created. |
| Group Id | This is the unique ID from Power BI workspaces. |
| User Name | This is the username of the Azure Portal, which is required for authentication. |
| Password | This is the password of the Azure Portal, which is required for authentication. |
- Click on the “Save” button to save the progress.
- Next, from the same screen, select the “Power BI Report List” tab. Click on the edit icon in the action column of the Znode Reports. A pop-up will appear with the following fields:
| Field Name | Description |
| Report Name | It is a predefined field and can not be edited |
| Report Id | This is the unique ID from Power BI workspaces. |
- Add the required information in the fields
- Click on the “Save” button to save the progress.
Note: Only after the correct configurations are completed and reports are created at Power BI’s end, can users view the reports in the admin application.
- To assess the reports from the admin application, navigate to Reporting> BI Reports> Znode Reports.
NOTE: Currently, there is no support for creating custom Power BI reports.