TABLE OF CONTENTS
- Data Exchange Base Definition Details
- Data Exchange Scheduler Configuration Details
- Data Exchange Source Configuration Details
- Data Exchange Destination Configuration Details
- Data Exchange Mapping Configuration Details
- Notification Configuration
Navigate to: Dev Center > Commerce Connector > Data Exchanges

Select the data exchange to be configured and click the Edit icon under Actions.
The data exchange has two tabs in the left-hand navigation - Configuration Set and Configuration Change History - with Configuration Set being the default landing location. The term “configuration set” is used throughout Znode 10 to reference a configured set of related settings. In this scenario, the configuration set defines the components of a data exchange.
A data exchange has multiple sections to configure before it will run successfully. The sections that a data exchange requires to be configured will adjust based on some configuration selections.
Detail | Description |
Base Definition | Contains identifying information for the data exchange. |
Scheduler Configuration | Configures the schedule for the data exchange should run. |
Source Configuration | Configures the source of the data. |
Destination Configuration | Configures where the data is delivered to. |
Mapping | Configures the field mapping from the source data format to the destination data format. |
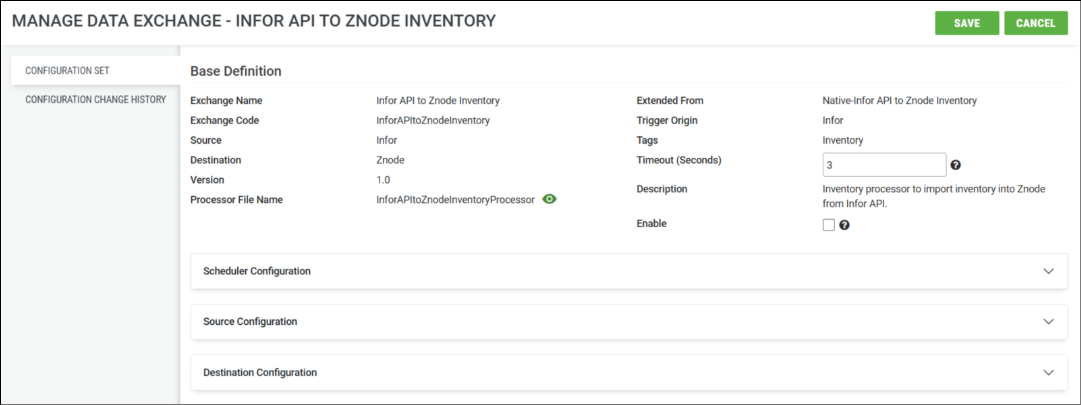
Data Exchange Base Definition Details
Navigate to: Dev Center > Commerce Connector > Data Exchanges > Selected Data Exchange > Configuration Set > Base Definition

Detail | Description |
Exchange Name | A unique name to identify the data exchange. This value cannot be edited once created. |
Exchange Code | A unique code to identify the data exchange. This value cannot be edited once created. |
Source | Identifies where the data in the data exchange is coming from, i.e. sender of the data. |
Destination | Identifies where the data in the data exchange is headed to, i.e. recipient of the data. |
Version | Version number of the data exchange. |
Processor File Name | The file name of the custom developed, compiled, and deployed data exchange processor. |
Trigger Origin | Identifies what system has the responsibility to initiate the data exchange. |
Tags | Tags that identify the data exchange. |
Timeout
| This allows administrators to define the maximum duration (in seconds) a data exchange process is allowed to run before it is automatically terminated.
|
Description | Detailed description of the data exchange. A quality description aids in understanding the data exchange without having to review the full configuration. |
Enable | Enables and disables the data exchange. Checked indicates the data exchange is enabled; unchecked is disabled. |
Data Exchange Scheduler Configuration Details
Navigate to: Dev Center > Commerce Connector > Data Exchanges > Selected Data Exchange > Configuration Set > Scheduler Configuration
The Scheduler Configuration controls the schedule on which the data exchange is run. The fields that require configuration change based on the “Scheduler Type” selected.
Scheduled Scheduler Type
The “Scheduled” scheduler type is intended for the use cases that require a data exchange to run automatically.
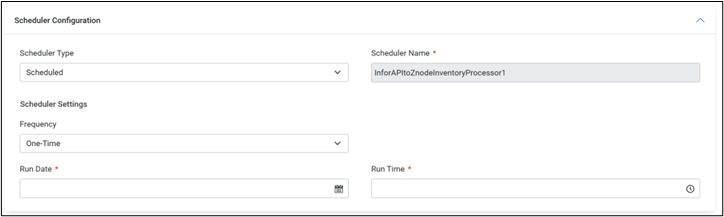
Detail | Description |
Scheduler Type | Scheduled |
Scheduler Name | An identifying name for the scheduler with respect to the data exchange name. |
Frequency | One-Time - Defines a schedule that runs a data exchange one time. Recurring - Defines a schedule that runs a data exchange more than one time. The data exchange may be scheduled to run multiple times a day or to run on specific days and months, etc. |
Run Date | First date the data exchange should run. |
Run Time | Time (on the run date) the data exchange should run. |
Cron Expression | The Cron Expression defines the schedule on which a recurring data exchange is run. A user-friendly list of Cron expressions is available under Commonly Used Cron Expressions. Administrators can copy any Cron expression and add it to the Cron Expression field. |
On-Demand Scheduler Type
The “On-Demand” scheduler type is intended for the use cases that require a data exchange configuration to be saved, but do not run automatically. The data exchange may be one that has been configured, and a schedule is waiting to be determined, or it may be one that will always be manually run.

Detail | Description |
Scheduler Type | On-Demand |
Scheduler Name | An identifying name for the scheduler with respect to the data exchange name. |
Data Exchange Source Configuration Details
Navigate to: Dev Center > Commerce Connector > Data Exchanges > Selected Data Exchange > Configuration Set > Source Configuration
The Source Configuration identifies where the data originates. The fields that require configuration change based on the “Transmission Mode” selected.
The “Test Connectivity” action is available regardless of the transmission mode selected. After all credentials have been added, a user may test the connectivity to the configured server using the configuration details. A confirmation message will be displayed with the results of the test.
API Transmission Mode
When API “Transmission Mode” is selected, the fields require configuration changes based on the “Authentication Type” selected.


Configuration fields that are the same, regardless of the Authentication Type selection, are described in the following table.
Detail | Description |
Transmission Mode | API |
API Action | API action to use when calling the endpoint. Options: GET and POST |
Endpoint | Address of the endpoint from which to retrieve the source data. |
Authentication Type | Type of authentication to use when calling the endpoint. Options: Basic, OAuth 2.0, Bearer |
Format | Identifies the expected format of the destination file. Options: CSV, JSON, XML. |
Query Parameter | Key-Value pairs are appended to the end of an API endpoint URL to filter, sort, or modify the data returned by the server. They follow a ? character in the URL. |
Header Parameter | Key-Value pairs that provide metadata such as authentication tokens, content type, or client information. They help the server understand how to process a request or verify the client’s identity. |
Basic Authentication Type
The “Basic Authentication” authentication type is a simple authentication method where Znode sends a username and password encoded in Base64 with each API request. These credentials are included in the Authorization header, allowing the server to verify the user’s identity. HTTPS is used to ensure credentials are securely transmitted.
In Basic Authentication, the Authorization header is formatted as:
Authorization: Basic <base64(username:password)>

Configuration fields specific to the Basic Authentication Type selection are described in the following table.
Detail | Description |
Authentication Type | Basic |
API Key | Supported as an alternative authentication value for the Basic authentication type. Not typically used in Basic Authentication, however. |
Username | Unique identifier used to authenticate the client making the API request; combined with the password and encoded in Base64 for transmission in the Authorization header. |
Password | Secret associated with the username, used to verify the client’s identity; included with the username in the Authorization header as part of the Base64-encoded credentials. |
OAuth 2.0 Authentication Type
The “OAuth 2.0” authentication type is a secure and flexible authorization framework that allows Znode to access resources by exposing the login credentials. It uses access tokens, obtained through an authorization flow, to grant limited access to protected APIs on behalf of Znode.

Configuration fields specific to the OAuth 2.0 Authentication Type selection are described in the following table.
Detail | Description |
Authentication Type | OAuth 2.0 |
Grant Type | Specifies the method by which an access token is obtained. Each grant type defines a different flow. Examples: client_credentials, password. |
Access Token URL | Endpoint URL where Znode sends its authentication request to obtain an access token. |
Client ID | (Public) Identifier assigned to the Znode by the authorization server; used to identify Znode as the client making the request. |
Client Secret | (Confidential) value known only to Znode and the authorization server; used to authenticate Znode along with the Client ID when requesting tokens. |
Scope | Defines the level of access requested by Znode, specifying which resources or actions the token should allow. |
Bearer Authentication Type
The “Bearer” authentication type is a token-based authentication method where Znode includes an access token in the Authorization header of each API request. The token, typically issued by an authorization server, grants access to protected resources without requiring a username or password in the request.
The format of the Authorization header is:
Authorization: Bearer <token>
 Configuration fields specific to the Bearer Authentication Type selection (particularly the password or client_credentials grant types) are described in the following table.
Detail | Description |
Authentication Type | Bearer |
Grant Type | Defines how Znode obtains the bearer token, such as password (for the username/password flow) or client_credentials (for machine-to-machine access). The grant type determines which fields are required in the request. |
Access Token URL | Endpoint provided by the authorization server where Znode sends a request to obtain a bearer token. |
Client ID | Identifier assigned to Znode by the authorization server; used to identify Znode as the application requesting access. |
Client Secret | Confidential key issues to Znode, used in conjunction with the Client ID to authenticate Znode with the authorization server. |
Scope | A space-delimited list that defines what resources or permissions the token should grant access to; helps limit access based on what Znode needs access to. |
Username | (Only used with the password grant type) End user’s login name; included in the API request when Znode is acting on behalf of a specific user in the source system. |
Password | (Only used with the password grant type) End user’s password, submitted securely with the username to obtain a token for user-level access. |
SFTP Transmission Mode

Detail | Description |
Transmission Mode | SFTP |
Server Address | Identifies the address of the SFTP server from which the source data will be retrieved. |
Folder Path | Identifies the folder path on the SFTP server in which the source data will be found. |
File Name | Identifies the name of the file containing the source data. |
Port Number | Identifies the port number on which the SFTP request will be made. |
Username | User credential for accessing the SFTP server to retrieve the file. |
Password | Password credential for accessing the SFTP server to retrieve the file. |
Format | Identifies the expected format of the source file. Options: CSV, JSON, XML. |
BLOB Transmission Mode

Detail | Description |
Transmission Mode | BLOB |
Bucket Name | The name of the BLOB container or the display name. |
Access Key | The secret key, also called the storage account key, is used to authenticate and authorize access to the Azure storage account. |
Secret Key | The private key that authenticates and authorizes access to the Azure account storage. |
Configuration URL | Endpoint URL or connection URL used to access the storage account or a specific container. |
BLOB File Name | Identifies the name of the file containing the source data. |
BLOB Folder Path | The virtual directory structure inside the BLOB container where the file is stored. |
Format | Identifies the expected format of the source file. Options: CSV, JSON, XML. |
Data Exchange Destination Configuration Details
Navigate to: Dev Center > Commerce Connector > Data Exchanges > Selected Data Exchange > Configuration Set > Destination Configuration
The Destination Configuration details section is a duplicate of the Source Configuration. Please reference the Source Configuration details for guidance.
The Destination configuration can be optional. If no destination is specified, the initiating system will be treated as the destination. In this case, the application initiating the data exchange will receive the response as an API output.
Znode Import Transmission Mode
The Destination Configuration section includes all the functionalities of the Source Configuration section, with an additional feature specifically designed for Znode Imports. This feature simplifies the configuration process when Znode is selected as the destination.
In this setup, the Gateway URL and API Key are automatically prefilled based on the selected environment. The Locale ID can be modified using a drop-down menu populated from the admin locale list.
Users must then select the Import Type, which determines the kind of data to be imported into Znode. Depending on the selected import type, additional drop-downs for Family List, Store, Catalog, Discount Type, and Templates become available, as per Znode’s import processing requirements. Additional information related to import templates can be found in <insert link to existing import template article>.
Additionally, the YAML mapping for destination columns is automatically pre-filled according to the chosen import type. However, users are required to update the source column mappings accordingly.
Data Exchange Mapping Configuration Details
Navigate to: Dev Center > Commerce Connector > Data Exchanges > Selected Data Exchange > Configuration Set > Mapping
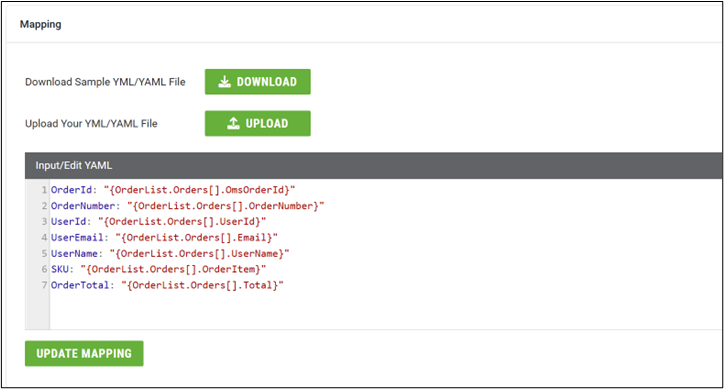
The “Mapping” configuration supports simple source data field mapping to destination field mapping. The mapping is stored as a YML/YAML file. When first adding a data exchange to a Znode environment, a native library data exchange will have the Input/Edit YAML dialog populated with the native mapping; a custom library exchange will have an empty Input/Edit YAML dialog.
A user may edit the Input/Edit YAML dialog directly and select the “Update Mapping” action to save the mapping changes. Else, the Znode admin tooling provides the ability to “Download” a sample YML/YAML file to assist in creating a custom mapping YML/YAML file.
An external YML/YAML file may be built and uploaded using the “Upload” action. Once the upload has completed, the contents will appear in the “Input/Edit YAML” dialog. Be sure to select “Update Mapping” to save any changes made to the Input/Edit YAML dialog.
Notification Configuration
Navigate to: Dev Center > Commerce Connector > Data Exchanges > Notification Configuration
The notification configuration allows you to set up email recipients for data exchange notifications.
 On this page user will select the store from the dropdown. Here, the already created stores in the admin would appear. The store selected here would be critical since SMTP settings would be used from that store.

To add data exchanges for email notifications, click the ADD NEW button. This will display a list of data exchanges not yet configured for notifications. Select the desired data exchange, add the recipient emails, and click the tick mark to add it to the notification list.

Emails about errors and notifications that occur during the execution of data exchanges will be sent to the configured email addresses.
The email templates used while triggering the data exchanges notification emails will be configured in the Email & SMS Templates in Znode
Navigate to: CMS > Email & SMS Templates
