
Overview
Znode enables customers to create orders through the Storefront using multiple Ecommerce purchasing workflows. Customers can add products to their cart using Search, Category Navigation, Quick Order, Order Templates, Previous Purchases, Wishlist, Saved Items (Save for Later), and Saved Carts.
Both registered customers and guest customers can place orders. Administrators can also create orders on behalf of customers by impersonating a customer account.
This article describes the available order creation methods, the checkout process, order status behavior, and order summary calculations.
Prerequisites
Before creating an order:
- Products must be available in the Storefront catalog.
- At least one shipping method must be configured.
- At least one payment method must be configured, or the shopper must have a voucher.
- Customers must have access to the Storefront.
- Guest Checkout must be enabled if guest customers are allowed to place orders.
Use Case 1: Create an Order as a Registered Customer
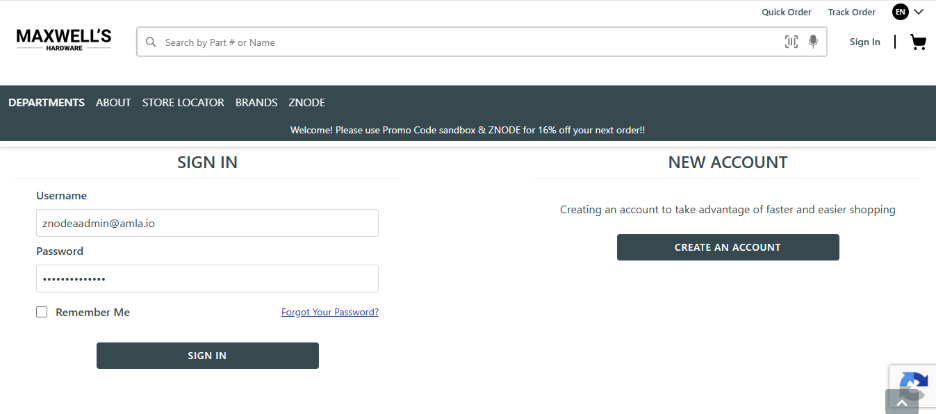
Step 1: Sign In to the Storefront
- Sign in to your Storefront account.
- If you do not have an account, register using the account creation process.
- Alternatively, continue shopping and sign in during checkout.
Expected Outcome
The customer is authenticated and can access account-specific features such as order history, saved carts, wishlists, and order templates.
Step 2: Add Products to the Cart
Customers can add products to the cart using one or more of the following Ecommerce workflows.
Option A: Search for Products
Search is one of the most common Ecommerce purchasing methods.
- Enter a product name, keyword, or SKU in the Storefront search bar.
- Select the desired product from the search results.
- Enter the required quantity.
- Select Add to Cart.
Expected Outcome
The selected product is added to the shopping cart.
Option B: Browse by Category
Customers can navigate the catalog hierarchy to locate products.
- Select a category from the Storefront navigation menu.
- Open the desired product.
- Enter the required quantity.
- Select Add to Cart.
Expected Outcome
The selected product is added to the shopping cart.
Option C: Reorder Previous Orders
This workflow is commonly used by B2B buyers who frequently purchase the same products.
- Navigate to My Profile > Order History.
- Open a previously completed order.
- Select Reorder.
Expected Outcome
Products from the selected order are added to the cart.
Option D: Use Quick Order
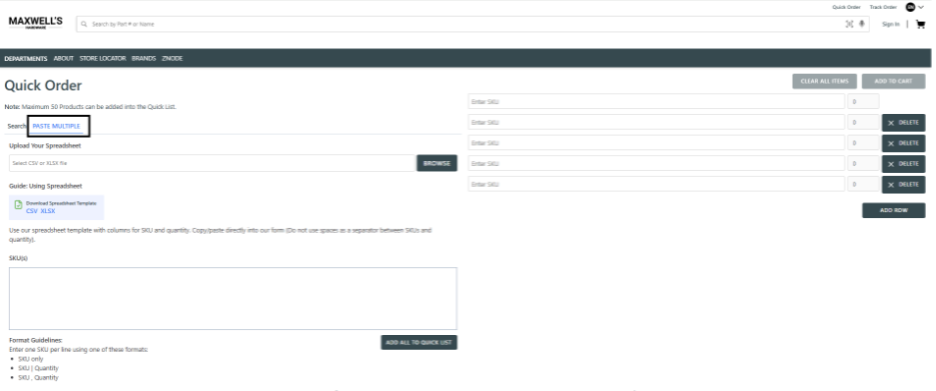
Quick Order allows buyers to place orders using product SKUs without browsing the catalog.
- Select Quick Order.
- Enter one or more product SKUs.
- Enter the required quantities.
- Optionally select Add Multiple Items.
- Optionally use the Paste Multiple feature to paste multiple SKUs simultaneously.
- Select Add to Cart.
Expected Outcome
The specified products are added to the cart.
Option E: Use an Order Template
Order Templates allow customers to quickly purchase recurring sets of products.
- Navigate to Order Templates.
- Locate the desired template.
- Select Add to Cart.
Expected Outcome
All products contained in the selected template are added to the shopping cart.
Common Ecommerce Scenario
B2B customers can use Order Templates to quickly reorder frequently purchased products without manually searching for each item.
Option F: Use Save for Later
Save for Later enables customers to temporarily remove products from the active cart while retaining them for future purchases.
- Navigate to the Cart page.
- Select Save for Later for the desired product.
- Verify that the product appears in the Saved Items section below the active cart.
- When ready to purchase the product, locate it in the Saved Items section.
- Select Move to Cart.
Expected Outcome
The product is moved back into the active shopping cart and is available for checkout.
Common Ecommerce Scenario
A customer shopping for multiple projects may save non-critical items for a future purchase while proceeding to checkout with only the required products.
Option G: Use a Saved Cart
Saved Cart allows customers to preserve an entire cart and restore it later.
- Navigate to the Cart page.
- Select Save Cart.
- Navigate to My Profile > Saved Cart.
- Locate the saved cart.
- Select Move to Cart.
Expected Outcome
Products from the saved cart are restored and added to the active shopping cart.
Common Ecommerce Scenario
Customers can save large B2B replenishment orders and reuse them without rebuilding the cart.
Option H: Use Wishlist
Wishlist allows customers to save products they intend to purchase at a later time.
Add Products to a Wishlist
- Navigate to a Product Listing Page (PLP) or Product Details Page (PDP).
- Select the option to add the product to the Wishlist.
Move Wishlist Products to the Cart
- Navigate to My Profile > Wishlist.
- Locate the desired product.
- Select Add to Cart.
Expected Outcome
The selected product is added to the shopping cart.
Common Ecommerce Scenario
Customers can save products for future purchasing decisions, seasonal procurement activities, or budget approval processes before committing to a purchase.
Option I: Use Previous Purchases
Previous Purchases enables buyers to quickly repurchase products without locating previous orders.
- Navigate to My Profile > Previous Purchases.
- Review previously purchased products.
- Enter the required quantities.
- Select Add to Cart.
Expected Outcome
The selected products are added to the shopping cart.
Common Ecommerce Scenario
Frequent purchasers can quickly reorder commonly purchased products without searching the catalog or opening prior orders.
Step 3: Review the Cart
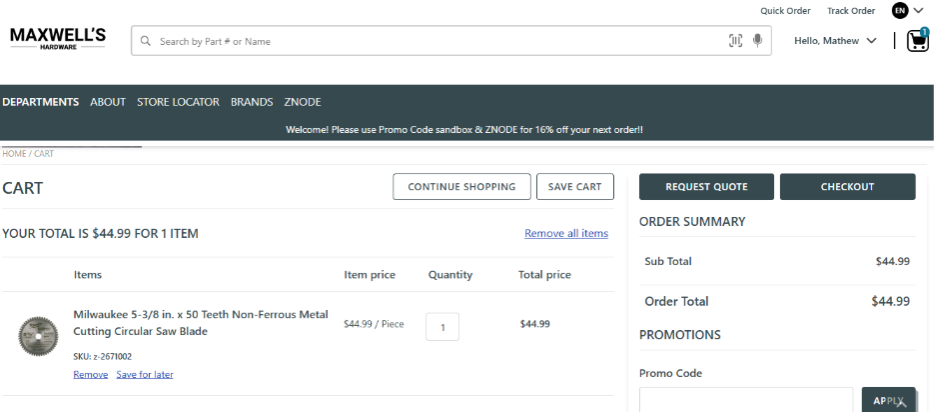
- Navigate to the Cart page.
- Review the products in the cart.
- Modify quantities if required.
- Apply a coupon code, if available.
- Remove products that are no longer required.
Expected Outcome
The shopping cart reflects the products, quantities, discounts, and pricing that will be processed during checkout.
Step 4: Proceed to Checkout
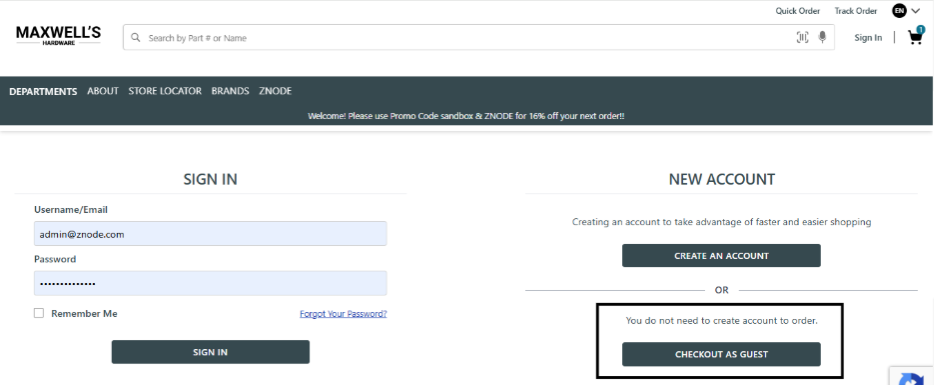
- Select Checkout.
- If already signed in, the Checkout page is displayed.
- If not signed in, select one of the available checkout options:
- Sign In
- Continue as Guest (if Guest Checkout is enabled)
Expected Outcome
The customer is directed to the Checkout process and can continue with order placement.
Step 5: Sign In (If Required)
If authentication is required before checkout:
- Enter your credentials.
- Complete the sign-in process.
Expected Outcome
The Checkout page is displayed and the customer can continue with order processing.
Step 6: Select Shipping and Billing Addresses
- Select an existing shipping address or create a new address.
- Select an existing billing address or create a new address.
Expected Outcome
The selected addresses are associated with the order and used during fulfillment and payment processing.
Role-Based Address Selection
Overview
During checkout, the addresses available for selection depend on the user's role and whether the user is associated with a B2B Account.
Depending on account configuration and permissions, customers may be able to:
- Select from their personal address book.
- Select shared account addresses.
- Create new shipping addresses.
- Create new billing addresses.
- Use addresses assigned through the B2B account hierarchy.
Expected Outcome
Customers see only the addresses available to their account and role permissions, ensuring orders are shipped and billed using approved account locations.
B2B Address Access by Role
Role-based address access is applicable only to B2B users who are associated with an Account. The available address actions and visible address list vary based on the assigned user role.
For B2C customers who are not associated with an Account, full address management capabilities are available.
Supported Roles
The following roles support role-based address permissions:
- Administrator
- Manager
- User
Administrators can assign and manage these roles through user imports or from the Admin Console.
Administrator Role
Users assigned the Administrator role have full access to account-level addresses.
Available Permissions
- View all addresses associated with the Account.
- Add new addresses.
- Edit existing addresses.
- Select any account address during checkout.
Address Visibility
The complete Account Address List is displayed.
Common Business Scenario
An account administrator manages shipping and billing locations for all buyers associated with the organization.
Manager Role
Users assigned the Manager role can access all account addresses but cannot modify them.
Available Permissions
- View all addresses associated with the Account.
- Select any account address during checkout.
Restricted Permissions
- Cannot add addresses.
- Cannot edit addresses.
Address Visibility
The complete Account Address List is displayed.
Common Business Scenario
A purchasing manager can ship orders to any approved company location but cannot maintain address records.
User Role
Users assigned the User role have restricted address visibility and access only to approved account-level addresses.
Available Permissions
- View the Account's default shipping address.
- View the Account's default billing address.
- Select the default addresses during checkout.
Restricted Permissions
- Cannot add addresses.
- Cannot edit addresses.
- Cannot view the complete Account Address List.
Address Visibility
Only the following addresses are displayed:
- Default Billing Address.
- Default Shipping Address.
Common Business Scenario
Individual buyers place orders using company-approved default shipping and billing locations, ensuring compliance with organizational purchasing policies.
B2C Customer Address Access
B2C customers are not associated with an Account. Therefore, role-based account address restrictions do not apply.
Available Permissions
B2C customers can:
- View saved addresses.
- Add new addresses.
- Edit existing addresses.
- Delete addresses (if enabled).
- Select any saved address during checkout.
Address Visibility
All addresses associated with the customer's profile are displayed.
Common Business Scenario
A consumer manages personal home, office, and alternate shipping addresses independently and can choose any saved address during checkout.
Expected Outcome
During checkout, address availability and management capabilities are controlled by the customer's account type and assigned role. B2B users see only the addresses permitted by their role, while B2C customers can fully manage and select from all addresses associated with their profile.
Address Visibility Summary
| User Type | View All Addresses | Add Address | Edit Address |
|---|---|---|---|
| Administrator | Yes (All Account Addresses) | Yes | Yes |
| Manager | Yes (All Account Addresses) | No | No |
| User | No (Default Billing and Shipping Addresses Only) | No | No |
| B2C Customer | Yes (Personal Addresses) | Yes | Yes |
Step 7: Select a Shipping Method
- Review the available shipping methods.
- Select the desired shipping method.
Expected Outcome
The selected shipping method is applied to the order and shipping charges are calculated.
Step 8: Apply Coupons (Optional)
- Enter a valid coupon code.
- Select the option to apply the coupon.
Expected Outcome
If the coupon is valid, the applicable discount is applied to the order total.
Step 9: Apply Vouchers (Optional)
- Enter the voucher information.
- Apply the voucher.
Expected Outcome
The voucher amount is applied to the order according to the voucher configuration.
Step 10: Add Additional Information (Optional)
Customers can provide additional details or special instructions related to the order. This information helps sellers fulfill orders more accurately without affecting the checkout process.
Examples include:
- Delivery preferences.
- Purchase Order (PO) references.
- Gift messages.
- Special handling instructions.
- Internal procurement references.
Expected Outcome
Additional information is saved with the order and is available for review during order processing.
Step 11: Select a Payment Method
- Select the desired payment method.
- Enter the required payment information.
Expected Outcome
The selected payment method and associated payment details are applied to the order.
Step 12: Place the Order
- Review the order details.
- Select Place Order.
Expected Outcome
When the order is successfully placed, Znode performs the following actions:
- Creates the order record in the Admin Console.
- Displays the order in OMS > Orders > Manage Orders.
- Creates the order record in the customer's Order History.
- Allows the shopper to view placed orders from their account profile.
- Displays the Thank You page (Order Receipt).
- Sends an order confirmation email to the customer.
- Sends an order notification email to the Administrator.
Order Placement Result
The order is successfully submitted, payment is processed based on the selected payment method, and the order becomes available for fulfillment and order management activities within Znode.
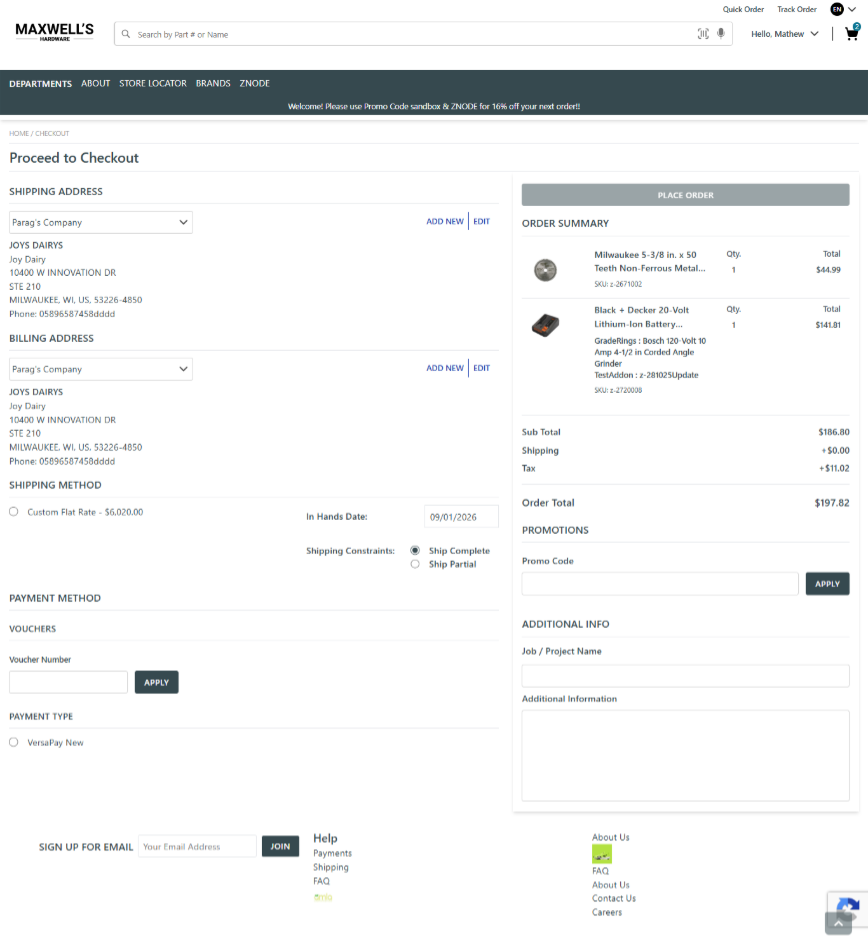
After Order Placement
Thank You Page
After an order is placed successfully, the shopper is redirected to the Thank You Page (Order Receipt), where they can review the order details.
The Thank You Page serves as immediate confirmation that the order was successfully submitted.
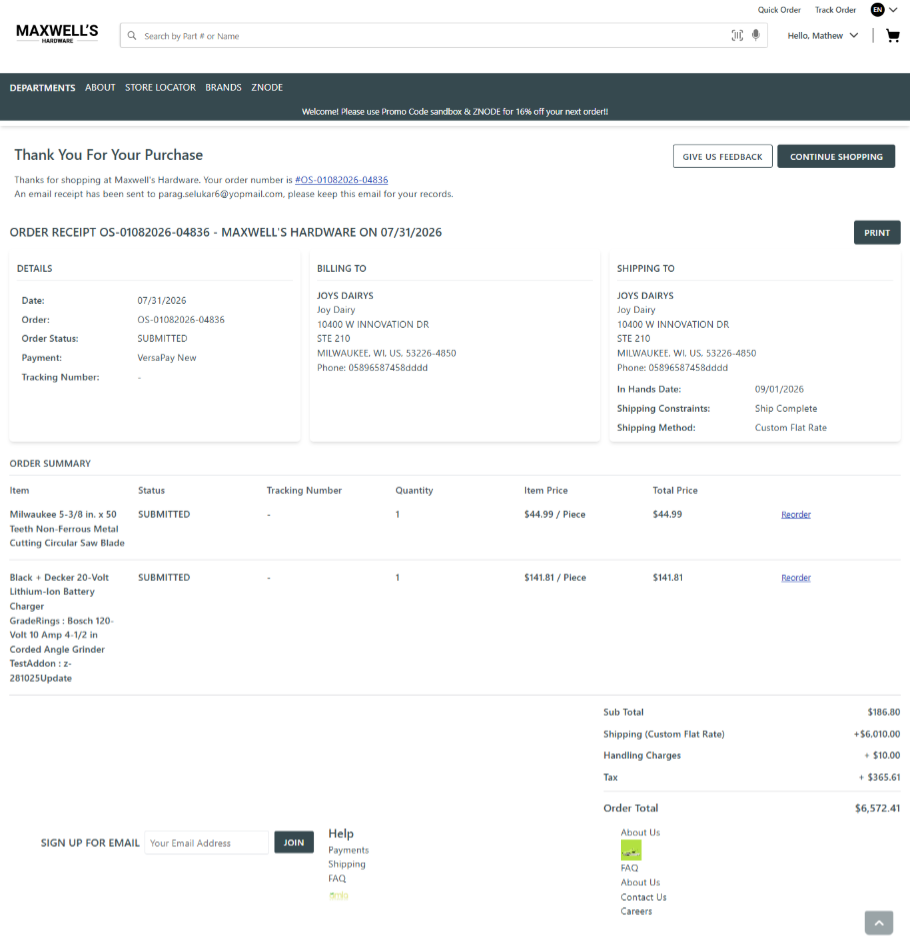
Information Typically Displayed on the Thank You Page
- Order Number
- Order Date
- Billing Address
- Shipping Address
- Ordered Products
- Order Totals
- Payment Information
- Initial Order Status
Expected Outcome
The shopper receives immediate confirmation that the order was placed successfully and can review the order receipt information.
Email Notifications
After an order is successfully placed, Znode generates notification emails for both the customer and designated administrators.
Customer Notification
An order confirmation email is sent to the customer's registered or guest email address.
The email typically includes:
- Order Number
- Order Date
- Billing Information
- Shipping Information
- Ordered Products
- Order Totals
- Order Status
This notification is generated using the Order Receipt email template.
Expected Outcome
The customer receives a confirmation email containing the order details and purchase summary.
Administrator Notification
An order notification email is sent to the administrator email addresses configured for the Store.
The notification allows administrators to:
- Review newly submitted orders.
- Begin order fulfillment and processing activities.
- Monitor incoming Storefront orders.
This notification is generated using the Order Placed Notification email template.
Expected Outcome
Administrators are notified of new orders and can begin fulfillment activities promptly.
Order Notification Alerts
Administrators can configure order notification emails based on order value thresholds.
Examples include:
- Send notifications for all orders.
- Send notifications only when an order exceeds a specified amount.
- Send notifications to one or more designated email addresses.
Example
An administrator can configure notifications so that all orders exceeding $1,000 trigger an email alert.
The shopper receives an acknowledgement email generated using the Order Placed Notification email template, while administrators receive notifications based on the configured alert criteria.
Expected Outcome
Order notifications are delivered to the appropriate recipients based on the Store's notification configuration, helping both customers and administrators stay informed about order activity.
Summary
Once an order is successfully submitted, the shopper receives immediate confirmation through the Thank You Page and email notifications, while administrators receive order alerts that support fulfillment, monitoring, and operational workflows.
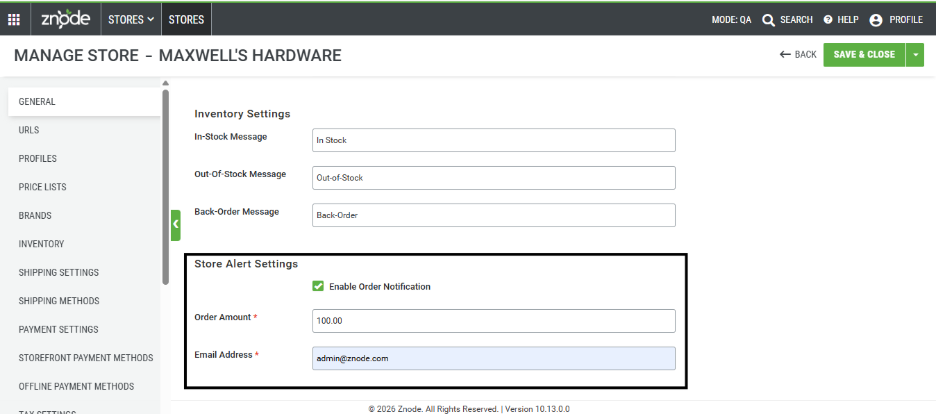
View Order History
Purpose
The Order History page allows shoppers to review previously submitted orders and track their purchasing activity.
Steps to View Order History
Historical order information is available for reference and tracking purposes.
- Sign in to the Storefront.
- Navigate to My Profile.
- Select Order History.
- Review the available order records.
Expected Outcome
The shopper can view orders available based on their role and account permissions.
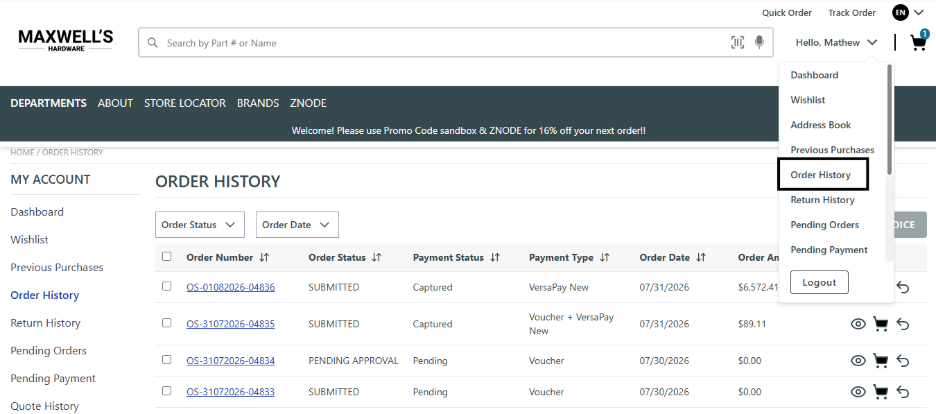
Order History Visibility by Role
The orders displayed in Order History are controlled by the user's assigned role.
User roles can be assigned:
- Through user import processes.
- From the Admin Console.
- By an Administrator.
Role-based order visibility applies only to B2B users associated with an Account. For B2C customers who are not associated with an Account, only their personal order history is displayed.
Supported Roles
- Administrator
- Manager
- User
Default Roles
| Customer Type | Default Role |
|---|---|
| B2B Customer | User |
| B2C Customer | Customer |
Administrator Role
Users assigned the Administrator role can view:
- Their own orders.
- Orders placed by all users associated with the same Account.
Example
If an Account contains:
- Administrator User A
- User B
- User C
- Manager D
Administrator User A can view orders placed by:
- User A
- User B
- User C
- Manager D
Common Business Scenario
An account administrator reviews all purchases made by users within the organization for procurement oversight, auditing, and order tracking.
Manager Role
Users assigned the Manager role can view:
- Only the orders they personally placed.
Common Business Scenario
Department managers can review and track their own orders without visibility into purchases made by other users within the organization.
User Role
Users assigned the User role can view:
- Only the orders they personally placed.
Common Business Scenario
Individual buyers can review their own purchasing history while maintaining privacy from other account users.
B2C Customer
B2C customers are not associated with an Account hierarchy.
B2C customers can view:
- Only their own order history.
Common Business Scenario
Consumers can track previous purchases, review order status, and reorder products from their personal account history.
Order History Visibility Summary
| User Type | View Own Orders | View Orders from Other Account Users |
|---|---|---|
| Administrator | Yes | Yes |
| Manager | Yes | No |
| User | Yes | No |
| B2C Customer | Yes | Not Applicable |
Order Status Behavior
The initial order status assigned to a new order is determined by the value configured in:
Store Administration > Store Settings > General Settings > Order Status
The configured status is displayed in the following locations:
- Order Receipt page.
- OMS > Orders > Manage Orders.
Example
If the configured Order Status is Submitted:
- The Order Receipt page displays Submitted.
- The order appears as Submitted in OMS > Orders > Manage Orders.
Expected Outcome
Shoppers can review historical orders based on their account permissions, while Administrators and B2B Account Administrators maintain visibility into order activity according to the configured role-based access controls.
Use Case 2: Create an Order as a Guest Customer
Guest customers can create orders using the same shopping and checkout process as registered customers, with the addition of selecting Checkout as Guest before entering shipping, billing, and payment information.
The resulting order behavior, notifications, Thank You Page, and Order Status functionality are identical to those described for registered customers.
Guest Customer Limitations
The following purchasing features are not available to Guest Customers:
- Reorder
- Order Templates
- Saved Cart
- Save for Later
- Wishlist
- Previous Purchases
Available Shopping Methods for Guest Customers
Guest Customers can add products to the cart using:
- Product Search
- Category Navigation
- Product Listing Pages (PLP)
- Product Details Pages (PDP)
- Quick Order (if available on the Storefront)
Checkout Process
- Add products to the shopping cart.
- Navigate to the Cart page.
- Select Checkout.
- Select Checkout as Guest.
- Enter shipping information.
- Enter billing information.
- Select a shipping method.
- Apply coupons or vouchers, if available.
- Select a payment method.
- Select Place Order.
After Order Placement
Thank You Page
After the order is placed successfully, the shopper is redirected to the Thank You Page (Order Receipt), where they can review the order details.
The Thank You Page serves as immediate confirmation that the order was successfully submitted.
Email Notifications
After an order is successfully placed, Znode generates notification emails for both the customer and the Store administrator.
Customer Notification
An Order Confirmation email is sent to the customer's registered or guest email address.
The email typically includes:
- Order Number
- Order Date
- Billing Information
- Shipping Information
- Ordered Products
- Order Totals
- Order Status
The customer notification is generated using the Order Receipt email template.
Administrator Notification
An order notification email is sent to the administrator email addresses configured for the Store.
The notification allows administrators to:
- Review newly submitted orders.
- Begin order fulfillment and processing activities.
- Monitor incoming Storefront orders.
The administrator notification is generated using the Order Placed Notification email template.
Order Notification Alerts
Administrators can configure notification emails based on order value thresholds.
Examples include:
- Send notifications for all orders.
- Send notifications only when an order exceeds a specified amount.
- Send notifications to designated email addresses.
Example
An administrator can configure notifications so that all orders exceeding $1,000 trigger an email alert.
The shopper receives an acknowledgement email using the Order Placed Notification email template, while administrators receive notifications according to the configured rules.
Order Summary Calculations
The Checkout page and Order Summary display the following calculations.
| Field | Description |
|---|---|
| Subtotal | Sum of line-item totals. |
| Shipping | Sum of shipping charges. |
| Handling Charges | Charges associated with the selected shipping method. |
| Import | Import duty amount when Avalara is configured. |
| Tax | Tax calculated on product and shipping amounts. |
| Discount (on Subtotal) | Product-level and order-level discounts. |
| Shipping Discount | Shipping-related discounts. |
| Order Total | Calculated total before voucher application. |
| Voucher Amount | Value of applied vouchers. |
| Amount To Be Paid | Remaining amount due after voucher application. |
Order Total Formula
Order Total = Subtotal + Shipping + Handling Charges + Import + Tax - Discounts - Shipping Discounts
Amount To Be Paid Formula
Amount To Be Paid = Order Total - Voucher Amount
Expected Outcome
Guest customers can successfully place orders without creating an account. Once the order is submitted, the system creates the order record, displays the Thank You Page, generates the appropriate email notifications, and calculates the final amount payable using the configured pricing, tax, shipping, discount, and voucher rules.
Information Saved with an Order
To ensure accurate order management, fulfillment processing, returns, reporting, and historical order integrity, Znode stores key transactional information at the time an order is placed.
The values saved with the order reflect the exact information used during checkout and remain available even if catalog pricing, inventory settings, promotions, tax rules, or product data change after the order is created.
Stored Order Information
- Product unit prices.
- Bundle component quantities.
- Out-of-stock option values.
- Line-item shipping amounts.
- Line-item tax amounts.
- Tax rates for custom tax providers.
- Product discount allocations.
- Order discount allocations.
- Shipping discount allocations.
- Handling charges.
- Voucher amounts.
- Tax setting values used during order creation.
Why Order Information Is Preserved
Historical order data is retained to ensure that subsequent business processes continue to use the values that existed when the order was originally placed.
This information supports:
- Accurate return and refund calculations.
- Consistent order management activities.
- Reliable financial and operational reporting.
- Historical order audits and customer service investigations.
- Discount and promotion traceability.
- Tax calculation validation.
Example
If a product price is updated after an order is placed, the original order retains the product price that existed at the time of purchase. Returns, refunds, and order reviews continue to use the original order values rather than the current catalog values.
Expected Outcome
Orders maintain a complete historical snapshot of pricing, taxes, discounts, shipping costs, vouchers, and related transaction details. This ensures that order processing, returns, reporting, and customer service activities remain consistent with the values approved and recorded when the order was created.