TABLE OF CONTENTS
Google Tag Manager Setup
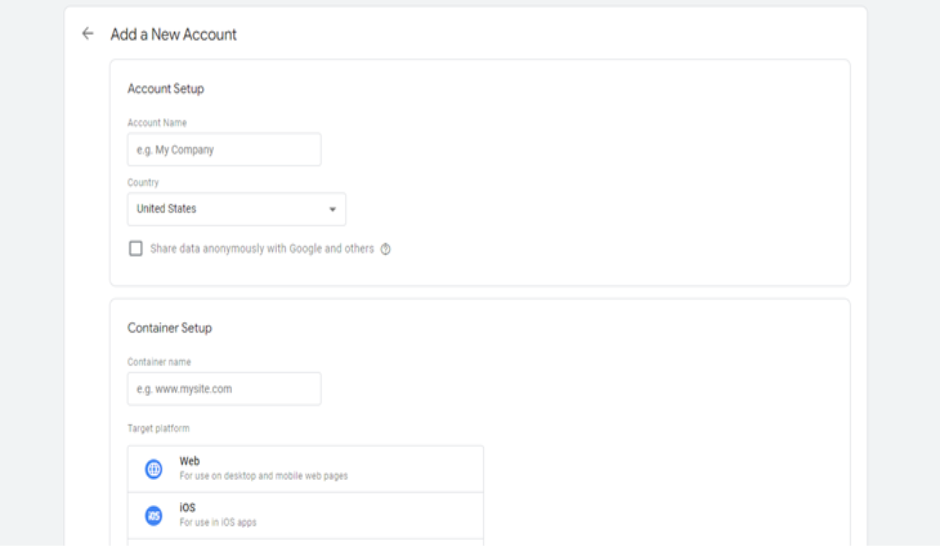
To implement Google Analytics 4 Pageview Tracking and Enhanced E-commerce Tracking, you must first create a Google Tag Manager (GTM) account and container.
- Navigate to the https://tagmanager.google.com/ Google Tag Manager website .
- Sign in using your Google account credentials.
- Click Create Account.
- Enter your Account Name (usually your company or organization name).
- Select the appropriate Country.
- Click Continue.
- Enter the Container Name (typically your website domain).
- Select Web as the target platform.
- Click Create and accept the Google Tag Manager Terms of Service.
- After the container is created, Google Tag Manager generates a unique Container ID (for example: GTM-ABC1234). This Container ID must be configured in Znode Admin.
Note: Save the generated GTM Container ID. It is required when configuring Google Tag Manager settings within Znode.
Create a Container
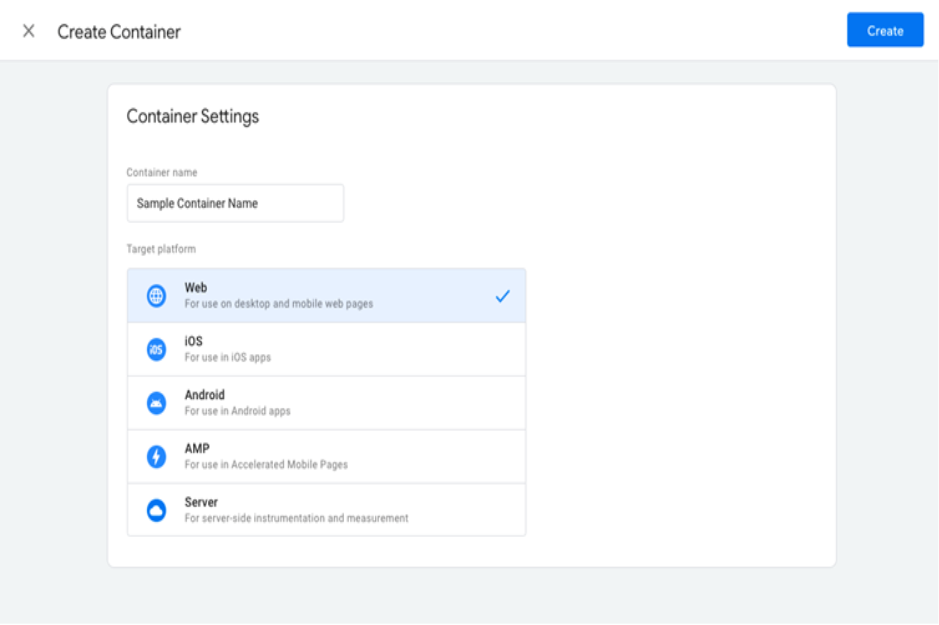
After creating a Google Tag Manager account, create a new container for the storefront website. The container serves as a repository for all tracking configurations, including tags, triggers, variables, and templates.
- Open the Google Tag Manager account.
- Click Create Container.
- Enter a descriptive Container Name (typically the website domain).
- Select Web as the target platform.
- Click Create and accept the terms of service.
Once the container is created, you can configure the required Templates, Triggers, Tags, and Variables needed for Google Analytics 4 Pageview Tracking and Enhanced E-commerce Tracking.
Import Znode Tracking Configuration
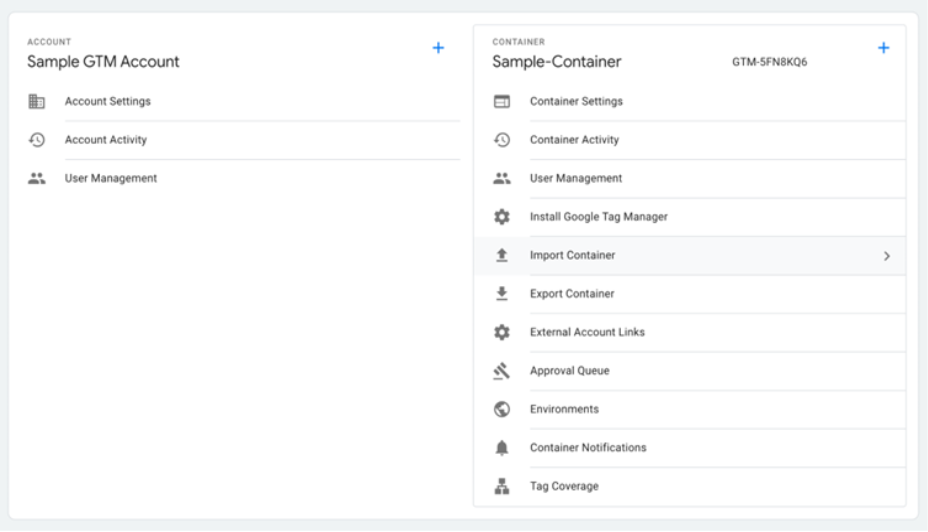
For new Znode installations that do not have any existing analytics or tracking setup, the required Google Tag Manager configuration can be imported using the tags.json file.
- Open the GTM container.
- Navigate to Admin > Import Container.
- Select the provided tags.json file.
- Choose the appropriate workspace.
- Review the imported Tags, Triggers, and Variables.
- Click Confirm to complete the import.
Note: The imported configuration provides the baseline setup required for Znode storefront tracking. Review the configuration before publishing changes to production.
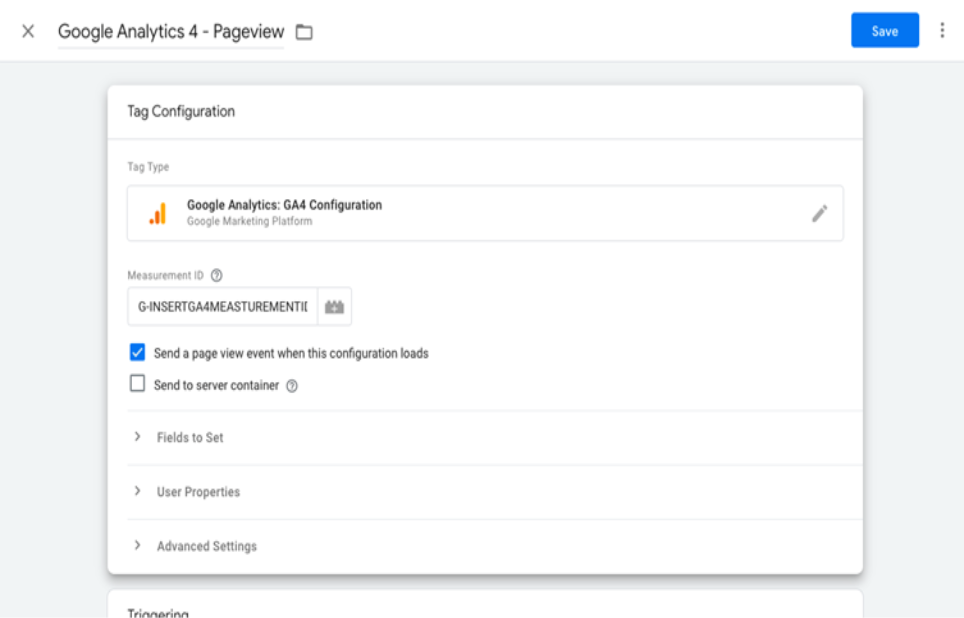
After importing the container configuration, a valid Google Analytics 4 Measurement ID must be configured. Without a valid Measurement ID, tracking events will not be recorded in Google Analytics.
- Open the imported GA4 Configuration Tag.
- Locate the Measurement ID field.
- Enter the GA4 Measurement ID (for example: G-XXXXXXXXXX).
- Save the tag configuration.
- Submit and publish the container changes.
Important: Tracking data will only be sent to Google Analytics after the Measurement ID is configured and the container version is published.
Manual Configuration
The following sections describe how to manually configure the templates, triggers, variables, and tags required for Znode storefront tracking. These instructions can be used when:
- Adding tracking to an existing Google Tag Manager container.
- Migrating from another analytics implementation.
- Reviewing or customizing the default Znode tracking configuration.
- Troubleshooting tracking issues in an existing storefront.
The configuration includes setup for Google Analytics 4 page view tracking and Enhanced E-commerce events such as product impressions, product views, add-to-cart actions, checkout events, and purchase transactions.
Add Template
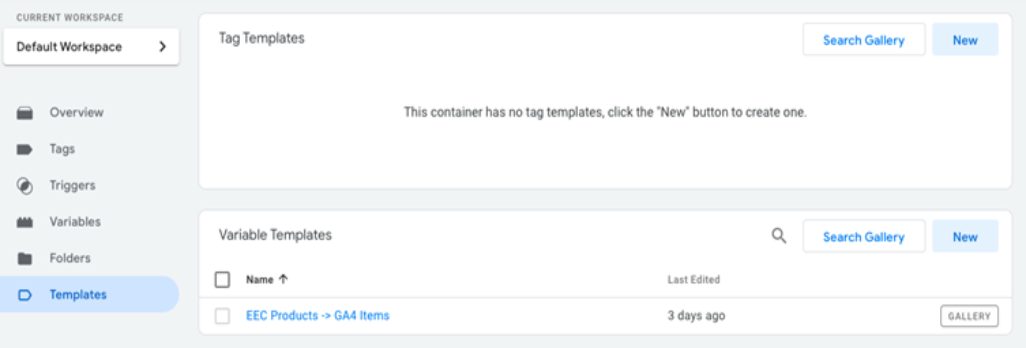
Navigate to Templates within the Google Tag Manager workspace and add the required template used for Enhanced E-commerce data transformation.
Add Variable Template
Select Search Gallery and add the following variable template to the workspace:
- EEC Products -> GA4 Items
Purpose: This template converts Enhanced E-commerce product objects into the Google Analytics 4 item structure required for ecommerce event tracking.
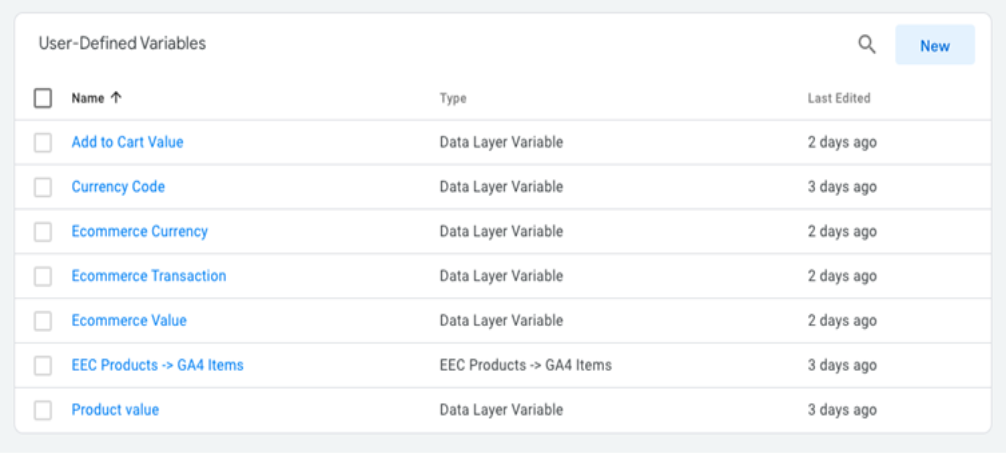
Add Variables
EEC Products -> GA4 Items Variable
| Setting | Value |
|---|
| Variable Name | EEC Products -> GA4 Items |
| Variable Type | EEC Products -> GA4 Items (Custom Template) |
| Map Source | Map ecommerce object automatically (Default) |
Currency Code Variable
| Setting | Value |
|---|
| Variable Name | Currency Code |
| Variable Type | Data Layer Variable |
| Data Layer Variable Name | ecommerce.currencyCode |
| Data Layer Version | Version 2 |
Product Value Variable
| Setting | Value |
|---|
| Variable Name | Product Value |
| Variable Type | Data Layer Variable |
| Data Layer Variable Name | ecommerce.detail.products.0.price |
| Data Layer Version | Version 2 |
Add to Cart Value Variable
| Setting | Value |
|---|
| Variable Name | Add to Cart Value |
| Variable Type | Data Layer Variable |
| Data Layer Variable Name | ecommerce.add.products.0.price |
| Data Layer Version | Version 2 |
Ecommerce Transaction Variable
| Setting | Value |
|---|
| Variable Name | Ecommerce Transaction |
| Variable Type | Data Layer Variable |
| Data Layer Variable Name | ecommerce.purchase.actionField.id |
| Data Layer Version | Version 2 |
Ecommerce Value Variable
| Setting | Value |
|---|
| Variable Name | Ecommerce Value |
| Variable Type | Data Layer Variable |
| Data Layer Variable Name | ecommerce.purchase.actionField.revenue |
| Data Layer Version | Version 2 |
Ecommerce Currency Variable
| Setting | Value |
|---|
| Variable Name | Ecommerce Currency |
| Variable Type | Data Layer Variable |
| Data Layer Variable Name | ecommerce.purchase.actionField.currency |
| Data Layer Version | Version 2 |
Note: These variables retrieve ecommerce data from the Znode storefront data layer and are referenced by Google Analytics 4 tags to track product views, add-to-cart events, and completed purchases.
Create the following Google Analytics 4 tags and triggers to capture page views, product detail views, and product selection events within the Znode storefront.
Google Analytics All Page Tracking
Configure a GA4 Configuration tag to track page views across the entire storefront.
| Setting | Value |
|---|
| Tag Name | Google Analytics 4 - Pageview |
| Tag Type | Google Analytics: GA4 Configuration |
| Measurement ID | Enter the Measurement ID from Google Analytics Admin |
| Send a Page View Event | True |
Trigger Configuration
| Setting | Value |
|---|
| Trigger Name | All Pages |
| Trigger Type | Page View |
| Trigger Condition | All Page Views |
Purpose: Tracks page view activity across the storefront and serves as the base configuration for all GA4 events.
Product Detail Views
Configure a GA4 Event tag to track product detail page views.
| Setting | Value |
|---|
| Tag Name | Product Detail View |
| Tag Type | Google Analytics: GA4 Event |
| Configuration Tag | Select the Google Analytics 4 - Pageview tag |
| Event Name | view_item |
Event Parameters
| Parameter Name | Value |
|---|
| items | {{EEC Products -> GA4 Items}} |
| currency | {{Currency Code}} |
| value | {{Product Value}} |
Ecommerce Settings
| Setting | Value |
|---|
| Send Ecommerce Data | True |
| Data Source | Data Layer |
Trigger Configuration
| Setting | Value |
|---|
| Trigger Name | Product Detail View Trigger |
| Trigger Type | Custom Event |
| Event Name | view_item |
| Trigger Condition | All Custom Events |
Data Layer Elements Tracked
- SKU
- Product Name
- Category Name
- Brand Name
- Product Price
- Currency Code
Purpose: Records product detail page views and sends product metadata to Google Analytics 4.
Product Clicks
Configure a GA4 Event tag to track product selections from Product Listing Pages (PLP), Search Results Pages (SRP), and other product collections.
| Setting | Value |
|---|
| Tag Name | Product Click |
| Tag Type | Google Analytics: GA4 Event |
| Configuration Tag | Select the Google Analytics 4 - Pageview tag |
| Event Name | select_item |
Event Parameters
| Parameter Name | Value |
|---|
| items | {{EEC Products -> GA4 Items}} |
Ecommerce Settings
| Setting | Value |
|---|
| Send Ecommerce Data | True |
| Data Source | Data Layer |
Trigger Configuration
| Setting | Value |
|---|
| Trigger Name | Product Click Trigger |
| Trigger Type | Custom Event |
| Event Name | select_item |
| Trigger Condition | All Custom Events |
Data Layer Elements Tracked
- SKU
- Product Name
- Category Name
- Currency Code
Purpose: Tracks user interactions with products selected from listings, search results, and merchandising components.
Add to Cart
Configure a GA4 Event tag to track when customers add products to their shopping cart.
| Setting | Value |
|---|
| Tag Name | Add To Cart |
| Tag Type | Google Analytics: GA4 Event |
| Configuration Tag | Select the Google Analytics 4 - Pageview tag |
| Event Name | add_to_cart |
Event Parameters
| Parameter Name | Value |
|---|
| items | {{EEC Products -> GA4 Items}} |
| currency | {{Currency Code}} |
| value | {{Add To Cart Value}} |
Ecommerce Settings
| Setting | Value |
|---|
| Send Ecommerce Data | True |
| Data Source | Data Layer |
Trigger Configuration
| Setting | Value |
|---|
| Trigger Name | Add To Cart Trigger |
| Trigger Type | Custom Event |
| Event Name | add_to_cart |
| Trigger Condition | All Custom Events |
Data Layer Elements Tracked
- SKU
- Product Name
- Brand Name
- Variant (if applicable)
- Quantity
Purpose: Tracks products added to the shopping cart and provides detailed product data for GA4 ecommerce reporting.
Remove from Cart
Configure a GA4 Event tag to track when customers remove products from their shopping cart.
| Setting | Value |
|---|
| Tag Name | Remove From Cart |
| Tag Type | Google Analytics: GA4 Event |
| Configuration Tag | Select the Google Analytics 4 - Pageview tag |
| Event Name | remove_from_cart |
Event Parameters
| Parameter Name | Value |
|---|
| items | {{EEC Products -> GA4 Items}} |
Ecommerce Settings
| Setting | Value |
|---|
| Send Ecommerce Data | True |
| Data Source | Data Layer |
Trigger Configuration
| Setting | Value |
|---|
| Trigger Name | Remove From Cart Trigger |
| Trigger Type | Custom Event |
| Event Name | remove_from_cart |
| Trigger Condition | All Custom Events |
Data Layer Elements Tracked
- SKU
- Product Name
- Brand Name
- Variant (if applicable)
- Quantity
Purpose: Tracks products removed from the shopping cart and provides visibility into cart abandonment and customer shopping behavior.
Checkout Behavior Report
Configure a GA4 Event tag to track when customers begin the checkout process. This event helps measure checkout initiation and identify potential drop-off points in the purchase journey.
| Setting | Value |
|---|
| Tag Name | Checkout Tag |
| Tag Type | Google Analytics: GA4 Event |
| Configuration Tag | Select the Google Analytics 4 - Pageview tag |
| Event Name | begin_checkout |
Event Parameters
| Parameter Name | Value |
|---|
| items | {{EEC Products -> GA4 Items}} |
Ecommerce Settings
| Setting | Value |
|---|
| Send Ecommerce Data | True |
| Data Source | Data Layer |
Trigger Configuration
| Setting | Value |
|---|
| Trigger Name | Checkout Trigger |
| Trigger Type | Custom Event |
| Event Name | begin_checkout |
| Trigger Condition | All Custom Events |
Data Layer Elements Tracked
- SKU
- Product Name
- Brand Name
- Variant (if applicable)
- Quantity
Purpose: Tracks when a customer initiates the checkout process and passes product information to Google Analytics 4 for checkout funnel reporting.
Purchase
Configure a GA4 Event tag to track completed purchases. This event records transaction details and revenue data and is used to measure ecommerce performance and conversions.
| Setting | Value |
|---|
| Tag Name | Purchase Tag |
| Tag Type | Google Analytics: GA4 Event |
| Configuration Tag | Select the Google Analytics 4 - Pageview tag |
| Event Name | purchase |
Event Parameters
| Parameter Name | Value |
|---|
| transaction_id | {{Ecommerce Transaction}} |
| value | {{Ecommerce Value}} |
| items | {{EEC Products -> GA4 Items}} |
| currency | {{Ecommerce Currency}} |
Ecommerce Settings
| Setting | Value |
|---|
| Send Ecommerce Data | True |
| Data Source | Data Layer |
Trigger Configuration
| Setting | Value |
|---|
| Trigger Name | Purchase Trigger |
| Trigger Type | Custom Event |
| Trigger Condition | Custom Event with Page URL validation |
Trigger Conditions
| Variable | Operator | Value |
|---|
| Page URL | Contains | /order/receipt |
Replace /order/receipt with the storefront's order confirmation or receipt URL if a different route is used.
Data Layer Elements Tracked
- SKU
- Product Name
- Brand Name
- Variant (if applicable)
- Quantity
- Transaction ID
- Order Revenue
- Currency
Purpose: Records completed ecommerce transactions in Google Analytics 4, including revenue, purchased products, and transaction identifiers required for conversion tracking and sales reporting.
Validation
After configuring all tags, triggers, variables, and templates:
- Open Google Tag Manager Preview Mode.
- Navigate through the storefront and perform test actions.
- Verify the following events are fired:
- view_item
- select_item
- add_to_cart
- remove_from_cart
- begin_checkout
- purchase
- Review the event payload and confirm all ecommerce parameters are populated correctly.
- Validate the events in Google Analytics 4 DebugView.
- Publish the GTM container after successful validation.
Important: Ecommerce reporting in Google Analytics 4 relies on accurate data layer values. Ensure that product details, transaction information, and currency values are populated before publishing the container configuration to production.
