
TABLE OF CONTENTS
- Data Exchange Base Definition Details
- Data Exchange List Actions
- Data Exchange Quick View
- Edit a Data Exchange
- Delete a Data Exchange
- Enable/Disable a Data Exchange
Navigate to: Dev Center > Commerce Connector > Data Exchanges
The “Data Exchanges” module introduced in Znode 10 is intended to replace the “Legacy ERP Connector” module; it is recommended to use the “Data Exchanges” module when implementing new data exchanges. The “Legacy ERP Connector” will not be enhanced and will be deprecated in the future.
The “Data Exchange List” is the landing page of the Data Exchanges menu item. The screen has a left-hand navigation menu, displays a grid of the data exchanges configured for the Znode instance, and provides options to add a new exchange. (Only multi step data exchanges can be added as new)
Each data exchange in the grid is an independent data exchange with its own configuration. The minimum fields required to create a data exchange are identified as the “Base Definition” of a data exchange. These fields will exist for both native and custom library data exchanges.
Data Exchange Base Definition Details
Navigate to: Dev Center > Commerce Connector > Data Exchanges
Detail | Description |
Exchange Name | A unique name to identify the data exchange. This value cannot be edited once created. |
| Exchange Code | A unique code to identify the data exchange. This value cannot be edited once created |
Source | Identifies where the data in the data exchange is coming from, i.e. sender of the data. |
Destination | Identifies where the data in the data exchange is headed to, i.e. recipient of the data. |
Version | Version number of the data exchange. |
Custom Processing Required | Checkbox to identify whether custom processing logic is needed for this data exchange. When checked, the “Processor File Name” field must be configured. When unchecked, the “Processor File Name” field is not displayed. |
Processor File Name | The file name of the custom developed, compiled, and deployed data exchange processor. |
Trigger Origin | Identifies what system has the responsibility to initiate the data exchange. |
Tags | Tags that identify the data exchange. |
Timeout
| This allows administrators to define the maximum duration (in seconds) a data exchange process is allowed to run before it is automatically terminated.
|
Description | Detailed description of the data exchange. A quality description aids in understanding the data exchange without having to review the full configuration. |
Enable | Enables and disables the data exchange. Checked indicates the data exchange is enabled; unchecked is disabled. |
Creating the base definition for a data exchange is not enough to enable the data exchange. For guidance on the remaining detailed data exchange configurations, please refer to the Configuring Data Exchanges documentation. q
Data Exchange List Actions
Navigate to: Dev Center > Commerce Connector > Data Exchanges
Detail | Description |
Edit (Paper & Pencil) | Allows Administrators to configure the data exchange. |
Run (Play Arrow) | Manual trigger for a data exchange. When clicked, the data exchange is triggered to run immediately. |
Enable/Disable | Shortcut action to enable/disable a data exchange. The icon for enable is a circle containing a checkmark; the icon for disable is a circle containing a diagonal line. A data exchange may only be enabled if its configuration is complete. |
History (Clock with Arrow) | Provides access to the history and status for a data exchange. |
Copy | Copies the configuration from the selected data exchange. Users can modify the exchange name and exchange code as needed.
|
Delete (Trash Can) | Action to delete a data exchange. |
Data Exchange Quick View
Navigate to: Dev Center > Commerce Connector > Data Exchanges
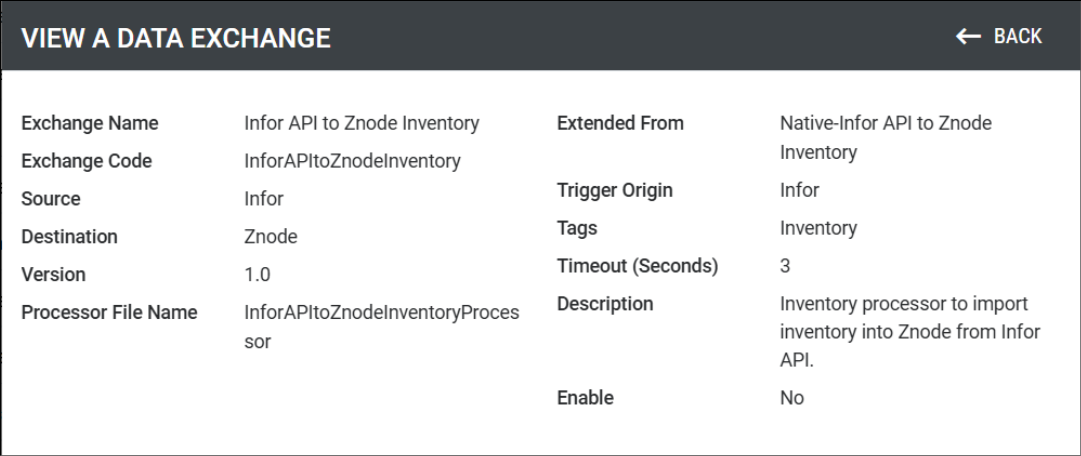
- Select the data exchange to quickly view by clicking the Exchange Name link.
- Select the “Back” action to return to the Data Exchange List.
Edit a Data Exchange
Navigate to: Dev Center > Commerce Connector > Data Exchanges
- Select the data exchange to be edited by selecting the edit icon (i.e., paper and pencil) under Action.
- Edit the configuration values that are not read-only.
- Save the updates using the “Save” action. The page reloads with the updates and with an action confirmation.
- The data exchange is now updated.
Delete a Data Exchange
Navigate to: Dev Center > Commerce Connector > Data Exchanges
- Select the data exchange to be deleted by selecting the delete icon (i.e. trash can) under Action.
- Answer “Ok” to the delete confirmation prompt.
- The updated page reloads with an action confirmation.
- The data exchange is now deleted.
Enable/Disable a Data Exchange
Navigate to: Dev Center > Commerce Connector > Data Exchanges
There are two paths to enabling/disabling a data exchange. A data exchange enabled without a complete configuration will fail; failures will be noted in the exchange logs.
The quickest path to enabling/disabling a data exchange is to find the exchange in the Data Exchange List grid and select the enable/disable icon under Action. You may also edit the status of a connector via editing the configuration.
- Select the exchange to be edited by clicking the edit icon (i.e. paper & pencil) under Action.
- Edit the “Enable” checkbox configuration under the Base Definition section. Checked means the data exchange is enabled; unchecked is disabled.
- Save the update using the “Save” action. The page reloads with the update and with an action confirmation.
- The data exchange “Status” value has been edited.