
Overview
Data Exchanges are configurable components within the Znode Commerce Connector that manage the flow of data between Znode and connected business systems such as ERP, CRM, PIM, DAM, and other third-party platforms. Administrators can configure, automate, monitor, and manage integrations directly from the Znode Admin Console without relying on extensive custom development.
Data Exchanges support both real-time and scheduled synchronization of critical business data, including products, pricing, inventory, customers, orders, and many more.
Prerequisites
Before configuring a Data Exchange, ensure that:
- Administrative access to the Znode Admin Console
- Connector enabled within the environment
- External APIs or systems available and accessible
- Required authentication credentials for external systems have been obtained.
- You understand which business entities (e.g., products, inventory, pricing, customers, or orders) will be exchanged.
Business Use Cases
Use Case 1: Synchronize Product Data from an ERP System
Configure a Data Exchange to import product information from an ERP system into Znode.
Common scenarios include:
- Creating new products in Znode.
- Updating product attributes.
- Synchronizing category assignments.
- Maintaining consistent product information across systems.
Use Case 2: Update Inventory Levels
Configure a Data Exchange that regularly synchronizes inventory quantities from an ERP or warehouse management system.
Common scenarios include:
- Displaying accurate stock availability.
- Reducing overselling.
- Improving buyer confidence.
Use Case 3: Export Orders to an ERP System
Configure a Data Exchange that transfers orders from Znode to an ERP system for fulfilment and processing.
Common scenarios include:
- Sales order creation.
- Order fulfilment workflows.
- Financial and operational reporting.
Configure a Data Exchange
Step 1: Access Commerce Connector
- Sign in to the Znode Admin Console.
- Navigate to Commerce Connector.
- Open the Data Exchanges.
Expected Outcome:
The Data Exchanges management page displays existing exchange configurations.
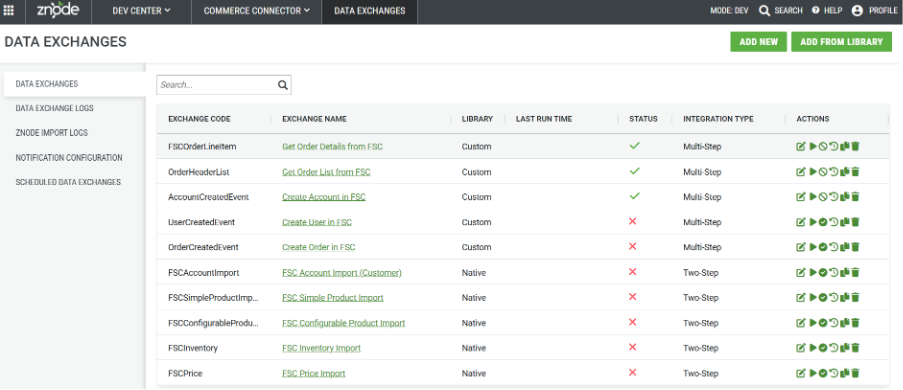
Step 2: Create a New Data Exchange
- Click on Add New or Add from Library to Create New Data Exchange.
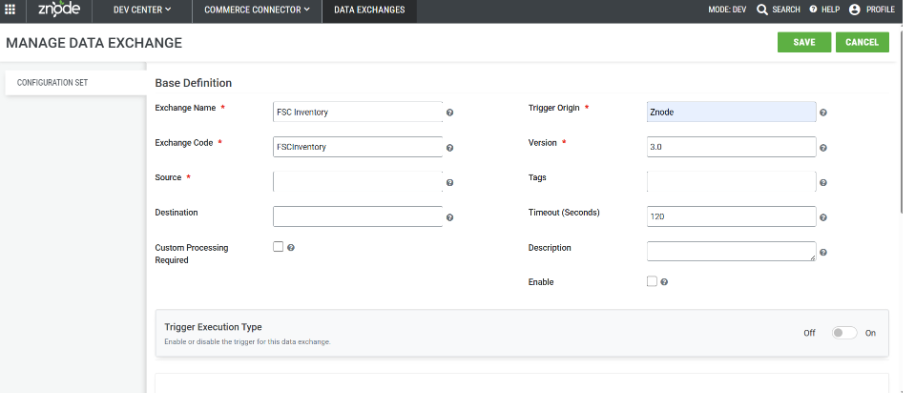
- After clicking on Add New, fill in the details as required.
| Field | Required | Description |
|---|---|---|
| Exchange Name | Required | Unique name used to identify the data exchange. This value cannot be modified after creation. |
| Exchange Code | Required | Unique code used to identify the data exchange. This value cannot be modified after creation. |
| Source | Required | Identifies the system sending the data. |
| Destination | Optional | Identifies the system receiving the data. |
| Version | Required | Version number of the data exchange. |
| Processor File Name | Required when Custom Processing Required is set to Yes | Name of the compiled and deployed custom data exchange processor file. |
| Trigger Origin | Required | Identifies the system responsible for initiating the data exchange. |
| Tags | Optional | User-defined tags that help identify and categorize the exchange. |
| Timeout | Optional | Maximum duration, in seconds, that the data exchange can run before it is automatically terminated. |
| Description | Optional | Detailed description of the data exchange. |
| Enable | Optional | Enables or disables the data exchange. Checked indicates enabled; unchecked indicates disabled. |
- Click on Save to save the details.
- Note: Native data exchanges can be added from the library using the Add from Library option. The library includes both two-step and multi-step data exchanges.
Expected Outcome:
A new Data Exchange configuration is created and available for editing.
Step 3: Trigger Execution Type
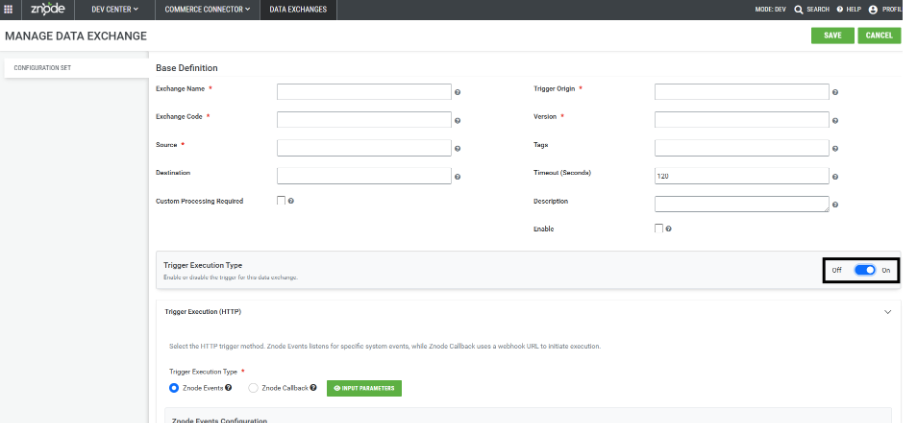
Enable
If the data exchange needs to be configured and execute as real time and no manual execution is required.
Enabling it would open the Trigger Execution (HTTP) tab for further configurations.
Note: The Data exchanges for which the Trigger Execution (HTTP) flag is enabled cannot be scheduled.
Keep it disabled, if the data exchange needs to run manually or be scheduled.
Step 4: Configure Trigger Execution (HTTP)
| Integration Type | Best For | Characteristics |
|---|---|---|
| Event-Based | Immediate business actions | Triggered by a specific event in Znode |
| Callback-Based | Receiving processing results | External systems notify Znode of completion. Znode waits for the response. |
| Multi-Step | Complex workflows | Multiple systems and actions working together |
Select trigger execution type.
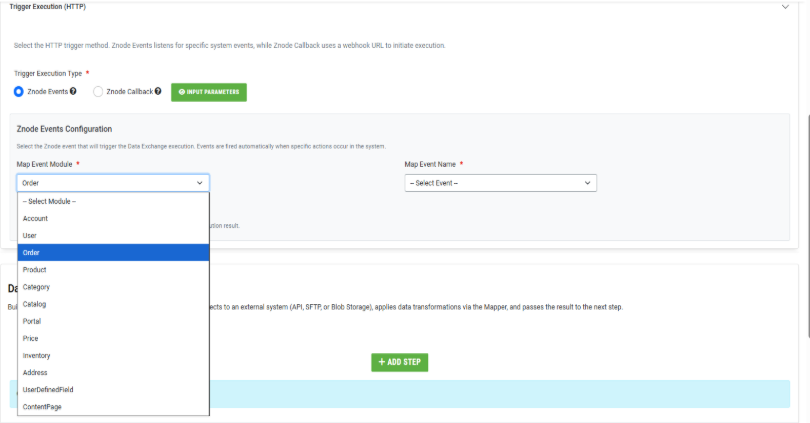
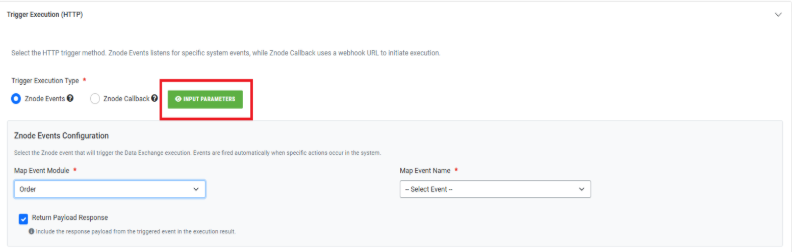
Znode Events Configuration (Push Model)
Select the required event module and the available event name. (Note: The events displayed in the dropdown are the same as the ones in Znode admin Webhook settings)
Return Payload Response
Check to include the response payload from the triggered event in the execution result.
To view the payload returned by the event that is selected click on the Input Parameters button.
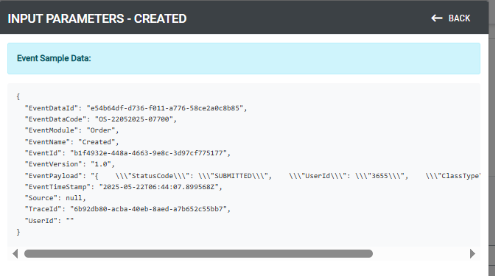
This will help map the details received from the event to the subsequent steps. Note: The event data payload is stored as the output of Step 0. To use values from this payload in later steps, refer to Step 0 in the mapping. For example,
Step2.SalesOrderName: Step0.Payload.EventDataCodemeans that the value ofEventDataCodefrom Step 0 is assigned toSalesOrderNamein Step 2.If the Return Payload Response option is enabled, the event payload is returned exactly as received from the configured event. If disabled, the system retrieves the corresponding entity details instead. For example, if the Order event module is configured for the Created event, the order details are returned and stored as the output of Step 0.
To view the properties of the Details API, refer to Stoplight.
Configure the subsequent steps to pass the event data. For example, to place a real-time order in Microsoft Dynamics 365 (FSC), configure steps to create the Order Header and Order Lines.
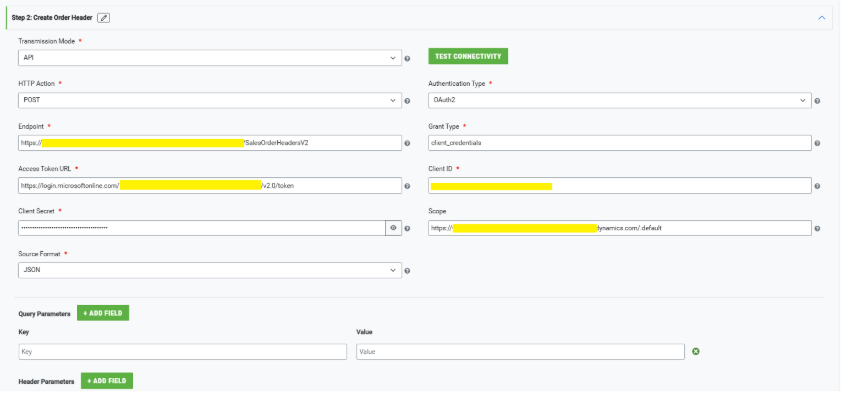
Fill in the required API configuration details. For FSC, the request body can be provided using the Request Body section in the step configuration.
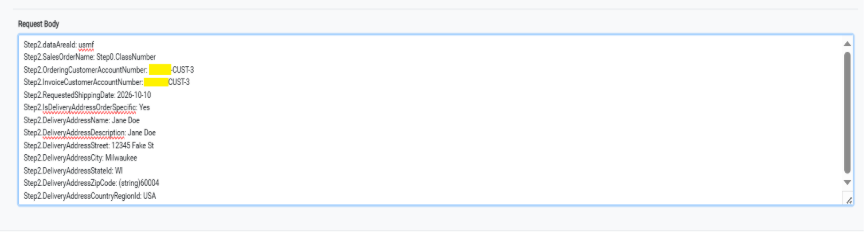
Note: The columns on the left-hand side represent the destination fields, while the columns on the right-hand side represent the source fields. When configuring mappings, the source fields must be prefixed with the corresponding Step Code (or step identifier) of the step from which the data is being referenced. In this example, the mappings reference data from Step 2, which executes the FSC Create Order Header API. Therefore, each source field is prefixed with Step2. to correctly identify the data source during mapping. The Order Line Item mappings can be configured using the same approach.
With proper configurations, real-time orders can be placed in FSC or any other ERP.
Map Event Module Map Event Name Account Created, Updated, Deleted User Created, Updated, EnableDisabledUsers, UpdateUserPortals, Deleted, AssociateUserAccount, UnAssociateUserAccount Product Created, Updated, Deleted, Published Category Created, Updated, Published, Deleted Catalog Created, Updated, Deleted, Published Portal Created, Updated, Deleted, Published Price Created, Updated, Deleted Inventory Created, Updated, Deleted Address Created, Updated, Deleted UserUpdatedFields Updated ContentPage Published CustomTabledData Created, Updated, Deleted ConfigurationSet Updated, Deleted 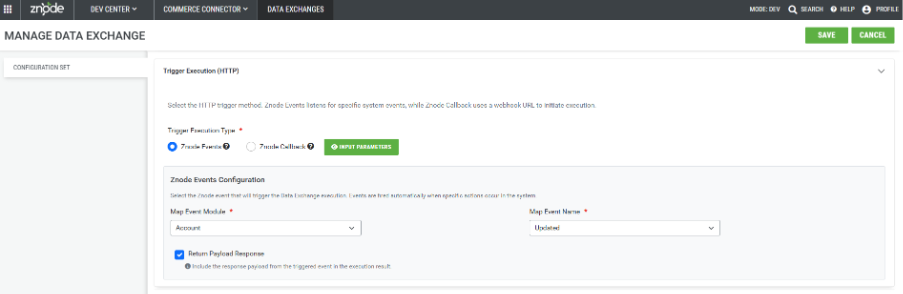
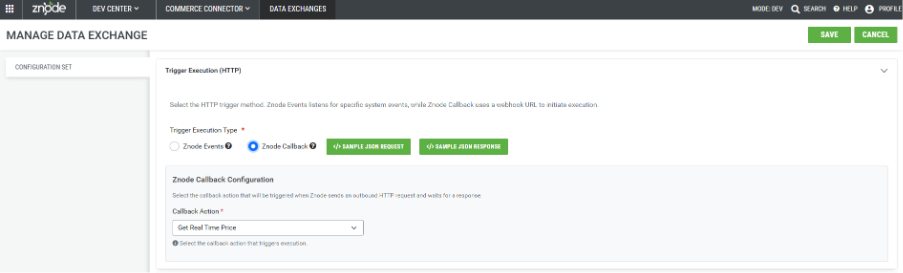
Znode Callback (Pull Model)
Callback Action Get Real Time Price Get Real Time Inventory
Callback Behavior- When a storefront request occurs
- Znode triggers the callback
- Commerce Connector calls the external API
- Response data is transformed using the Global Mapper
- Live data is returned to the storefront
Supported Storefront Scenarios
- Real-time pricing on PDP
- Real-time inventory availability
Step 5: Configure Data Flow (Multi-Step Integrations)
Purpose - multi-step integrations support business processes that require several connected actions across multiple systems.
- Click on Add Step.
- Here, multiple steps can be added by clicking on Add Step and removed by clicking on Delete Step.
- A step name and step code can be added for each step.
- Step code is mandatory and should be unique.
- A step name and step code can be added for each step.
- Here, multiple steps can be added by clicking on Add Step and removed by clicking on Delete Step.
- Specify transmission mode.
- API Transmission Mode
- Select API as the transmission mode when retrieving data from a web service or API endpoint.
- API Transmission Mode
- Click on Add Step.
Field Description Transmission Mode API HTTP Action GET, POST, PUT, DELETE, and PATCH Endpoint URL of the source endpoint. Authentication Type Basic, OAuth 2.0, Bearer, or Custom. Source Format CSV, JSON, or XML. Query Parameter Key-value pairs appended to the endpoint URL. Header Parameter Key-value pairs supplied in the request header. 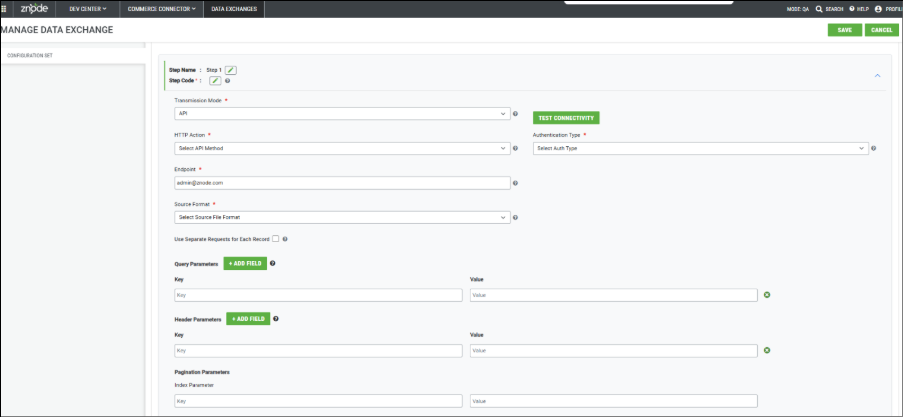
Basic Authentication
- Basic Authentication sends a Base64-encoded username and password in the request header.
- Use Case - Use Basic Authentication when the API provider requires username and password credentials.
Field Description Authentication Type Basic API Key Optional alternative authentication value. API Username User account used for authentication. API Password Password associated with the username. 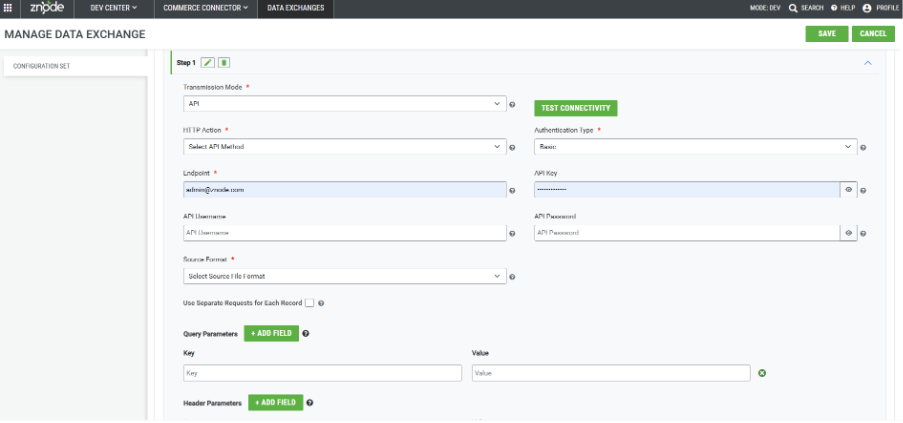
OAuth 2.0 Authentication
- OAuth 2.0 enables secure authorization through access tokens.
- Use Case - Use OAuth 2.0 when integrating with modern APIs that require token-based authorization.
Field Description Authentication Type OAuth 2.0 Grant Type Method used to obtain an access token. Access Token URL Endpoint used to retrieve the access token. Client ID Public identifier assigned by the authorization server. Client Secret Confidential value used during authentication. Scope Defines available permissions and resource access. 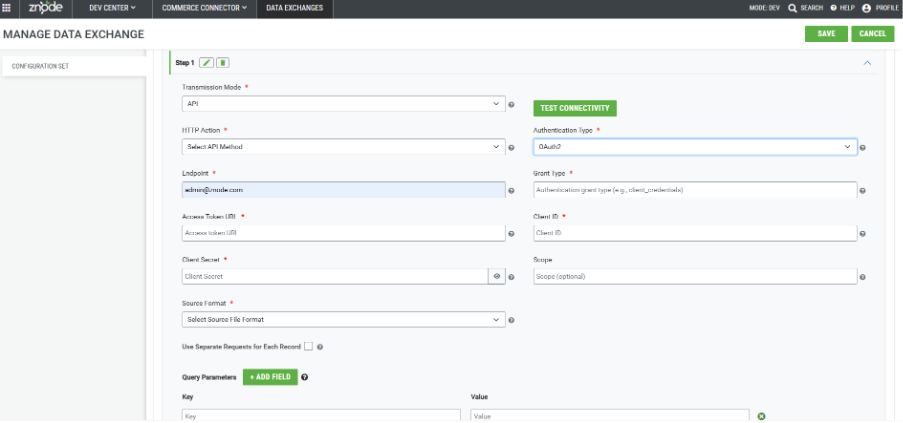
Bearer Authentication
- Bearer Authentication uses an access token supplied in each API request.
- Use Case - Use Bearer authentication when API access is controlled through security tokens.
Field Description Authentication Type Bearer Grant Type Defines how the bearer token is obtained. Access Token URL Token generation endpoint. Client ID Application identifier. Client Secret Application secret. Scope Permissions assigned to the token. API Username Used only with the password grant type. API Password Used only with the password grant type. 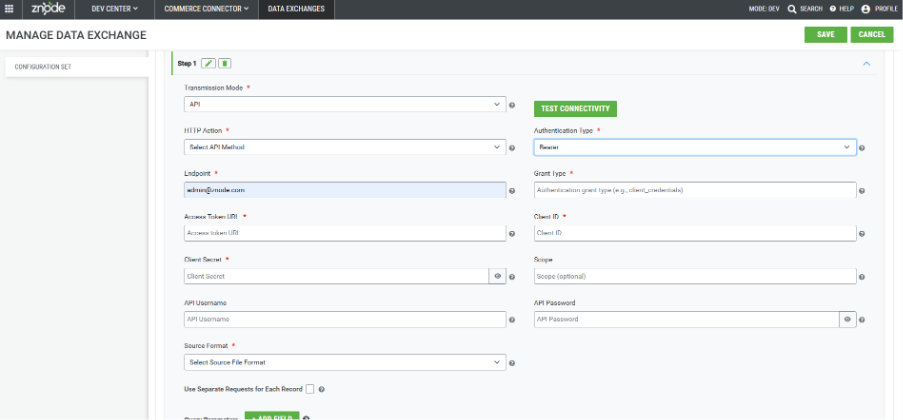
Custom Authentication
SFTP Transmission Mode
- Use SFTP when source data is hosted on a secure file transfer server.
- Use Case – Use Test Connectivity to confirm successful access to the SFTP server.
Field Description Transmission Mode SFTP Server Address SFTP server location. Folder Path Folder containing the source file. File Name Source file name. Port Port used for SFTP communication. Username SFTP username. Password SFTP password. Source Format CSV, JSON, or XML. 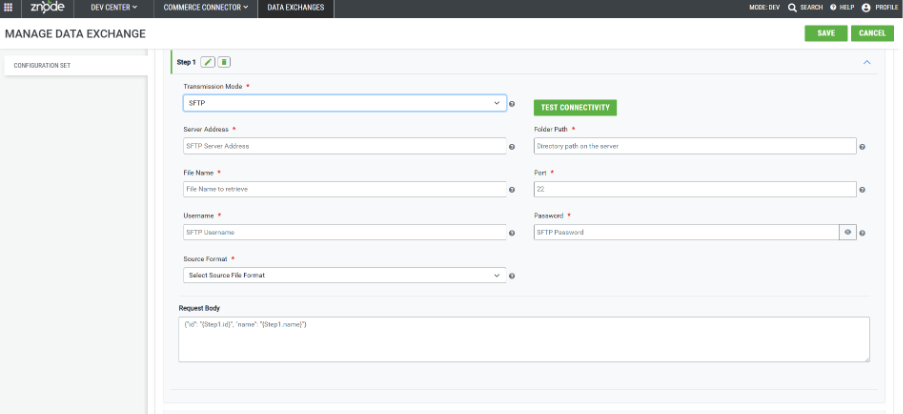
3. BLOB Transmission Mode
- Use BLOB storage when source files are stored in cloud-based object storage.
- Validation - Use Test Connectivity to verify access to the configured storage location.
Field Description Transmission Mode BLOB Bucket Name Storage container name. Access Key Key used to authenticate storage access. Secret Key Private authentication key. Configuration URL Storage account endpoint. BLOB File Name Name of the source file. BLOB Folder Path Virtual directory location of the file. Format CSV, JSON, or XML. 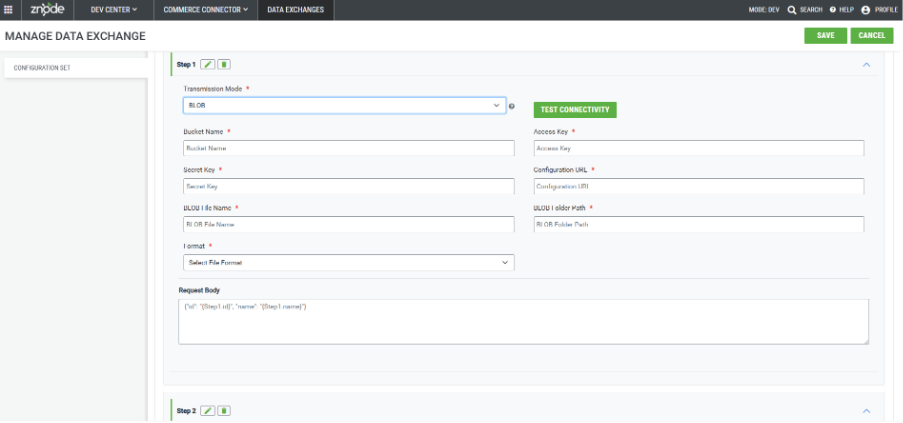
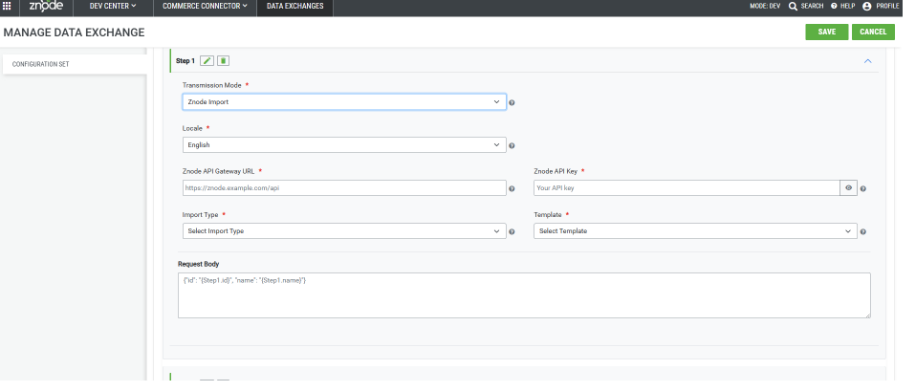
Znode Import Transmission Mode
Available features
- Configure the Gateway URL.
- Configure the API Key.
- Locale ID can be selected from available Admin locales.
- Select Import Type.
Import Types:
Product, Pricing, Inventory, Category, ZipCode, ProductAttribute, CategoryAssociation, Customer, CustomerAddress, ProductAssociation, SEODetails, Highlight, AddonAssociation, AttributeDefaultValue, Voucher, Account, Synonyms, CatalogCategoryAssociation, Brands, Promotion Sales Rep
Depending on the selected Import Type, additional selectors may be displayed:
- Family List
- Store
- Catalog
- Discount Type
- Templates
Destination YAML mapping is automatically generated based on the selected import type.
Note: The destination YAML structure is automatically generated. Administrators must still map source fields to the correct source column values.
Notes
- Use separate request for each record
When the target API supports only a single record per request, a new configuration flag named "Use Separate Requests for Each Record" has been introduced for API transmission types.
When this flag is enabled, the system processes each record individually instead of sending all records in a single request payload.
A looping mechanism has been implemented to iterate through all available line items and trigger separate API requests for each record. This ensures compatibility with APIs that accept only one record per request and prevents failures caused by bulk payload submissions.
- Reiterate Flag
- When checked The Reiterate option enables the data exchange to retrieve records iteratively using pagination. When enabled, the data exchange continues to retrieve records based on the configured Page Index and Page Size parameters until all records have been processed.
- Use separate request for each record
- Max Concurrent Pages
Specifies the maximum number of pages that can be retrieved and processed simultaneously. Increasing this value can improve performance by processing multiple pages in parallel. If left blank, pages are processed sequentially (one page at a time). If the endpoint enforces rate limits or cannot support the configured concurrency, the system automatically reduces the concurrency level and retries the request. Use the Execution History to monitor execution behavior and adjust this value if rate limiting persists.
- Max Concurrent Pages
How Multi-Step Integrations Work
- An event initiates a workflow.
- Data is sent to the first external system.
- The first system processes the request.
- Additional systems receive updated information.
- Validation steps occur as required.
- Callback responses update Znode.
- The workflow completes after all steps are successfully processed.
Example Scenario
Complete Order Processing Workflow
- A buyer submits an order.
- Znode sends order information to the ERP.
- The ERP validates inventory availability.
- The ERP sends fulfillment details to the warehouse.
- The warehouse ships the order.
- Shipment confirmation is returned through a callback.
- Znode updates the order status.
- Customer-facing tracking information becomes available.
Expected Outcome
All systems remain synchronized throughout the order lifecycle.
Request Body
- Pass on the fields in the form of Json for which the real-time data is to be obtained. e.g.,
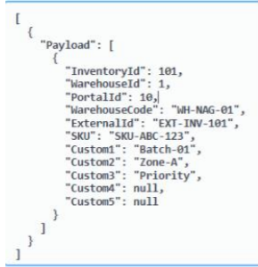
Note: The request body is stored as the output of Step 0. To access its properties in subsequent steps, use the mapping format
StepX.Property = Step0.Payload.Property(e.g.,Step1.SKU = Step0.Payload.SKU).Step 5: Mapper Configuration
The data obtained from configurations of Step 1 will be saved as a Step 1 output.
To get the final output, there is a global mapper, which will help get real-time data each time according to the mappings.
Note: The global mapper must use a prefix corresponding to the next step number after the last configured step. For example, if Step1 is the last configured step, the global mapper prefix should be Step2.
The final response that will be obtained API Gateway will be according to the mapping specified in the global mapper.
For detailed mapping standards refer this:

Notification Configuration
Navigate to:
Dev Center > Commerce Connector > Notification Configuration
Notification Configuration controls email recipients for data exchange execution notifications and errors.
Steps
- Navigate to Notification Configuration.
- Select a Store.
- Review the available data exchanges.
- Select Add New.
- Choose a data exchange that has not already been configured.
- Enter one or more recipient email addresses.
- Select the confirmation check mark.
- Save the configuration.
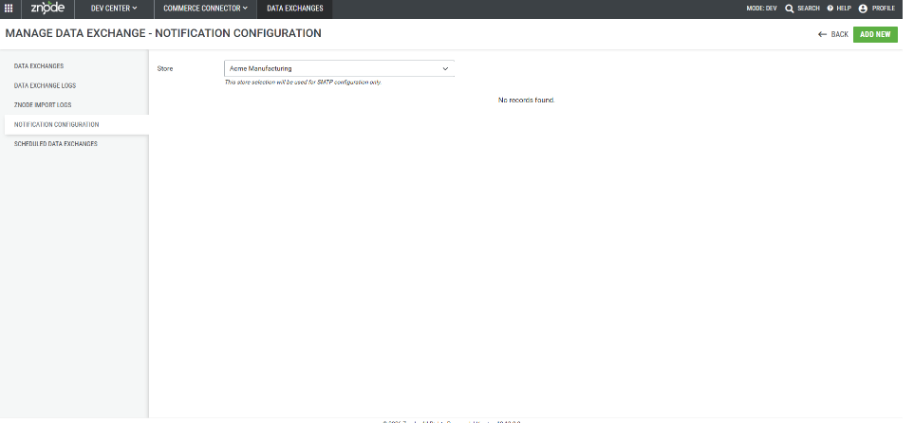
Expected Result - The selected email recipients are associated with the configured data exchange.
How Email Notifications Work
- Notification emails are sent when configured data exchanges execute.
- Error notifications are sent when execution failures occur.
- SMTP settings are inherited from the selected store.
- Only stores already configured in the Admin Console are available for selection.
Email Templates
Notification emails use templates configured in:
CMS > Email & SMS TemplatesAdministrators can customize these templates to control the formatting and content of generated notification emails.
Best Practices
- Use descriptive Exchange Names and Descriptions.
- Configure and validate connectivity before scheduling exchanges.
- Use On-Demand scheduling during testing.
- Verify mappings before enabling production schedules.
- Configure notification recipients for critical integrations.
- Use Timeout settings to prevent long-running processes from consuming system resources.
- Review Configuration Change History when troubleshooting unexpected behavior.
Scheduling Data Exchange Configuration
Navigate to:
Dev Center > Commerce Connector > Scheduled Data Exchanges
Steps
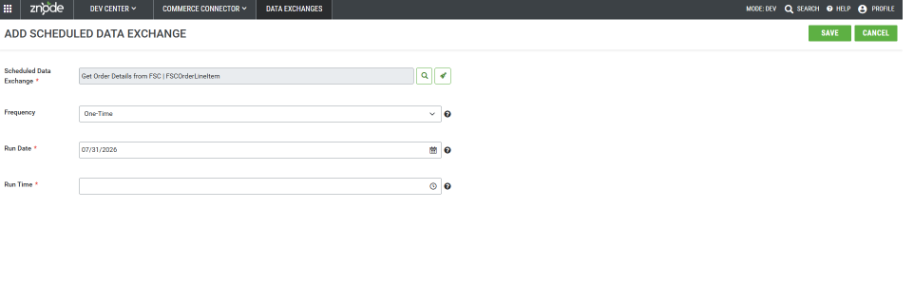
- Click scheduled data exchanges tab.
- Click on add new (top right on screen).
- Search for data exchange by clicking on search icon in scheduled data exchange field.
- Select the exchange from the modal.
- Select frequency.
- One-Time (use-case: activity which is not require repeatedly to execute).
- Recurring (use-case: pricing update, inventory update on storefront).
- Select run date and run time.
- Date format- MM/DD/YYYY e.g., 07/31/2026.
- Time format – hh:mm e.g., 12:00 AM.
Configuration Change History
The Configuration Change History tab displays an audit trail of all configuration changes made to the data exchange. It enables administrators to track the fields that were modified, their previous and updated values, the date and time of the change, and the user who made the update.
Field Description Field Displays the configuration field that was modified. Old Value Displays the value before the change was made. New Value Displays the updated value after the change. Changed Date Displays the date and time when the configuration change was saved. Username Displays the username of the user who made the configuration change. 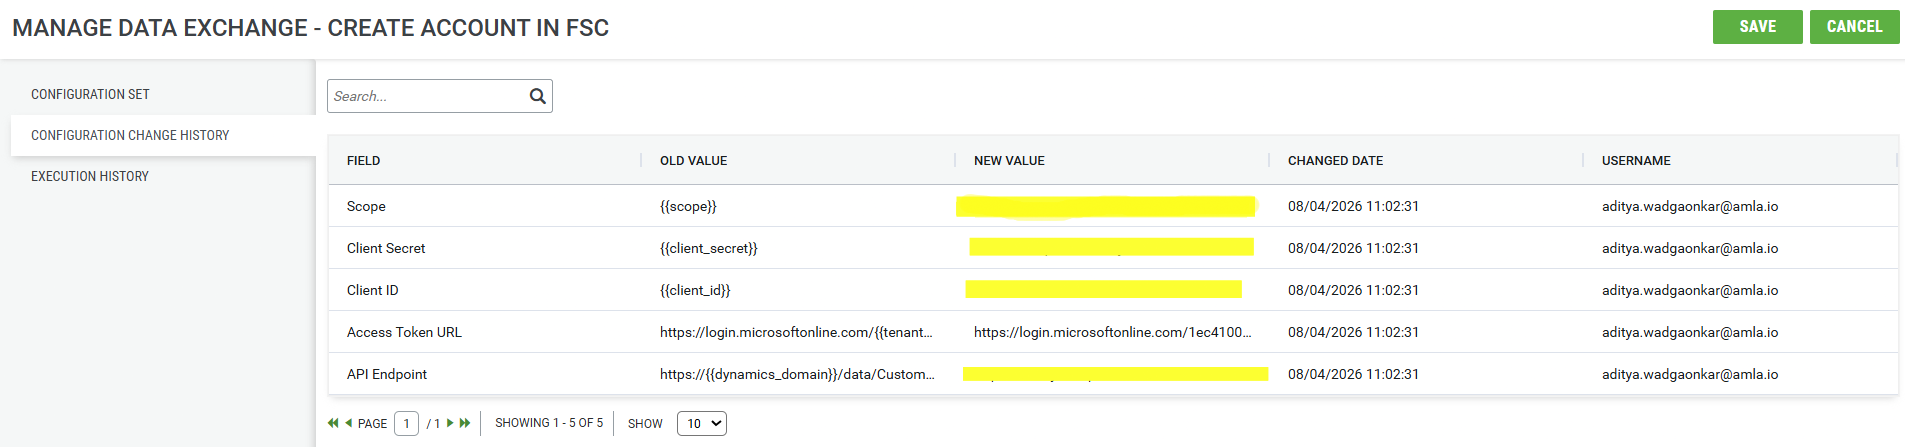
Execution History
The Execution History tab displays the execution details of the data exchange. It enables administrators to monitor the status of each execution, review the number of records processed, and access detailed execution logs for troubleshooting.
Note: Execution History is only available for Multi Step Data Exchange
Field Description Status Displays the current status of the data exchange execution. Start Time Displays the date and time when the execution started. End Time Displays the date and time when the execution completed. Duration Displays the total time taken to complete the execution. Records Processed Displays the total number of records processed during the execution. Records Succeeded Displays the number of records that were processed successfully. Records Failed Displays the number of records that failed during processing. Steps Displays the total number of steps executed as part of the data exchange. Error Summary Displays a summary of any errors encountered during the execution. Actions Click the View icon to view the detailed execution log for the selected execution. 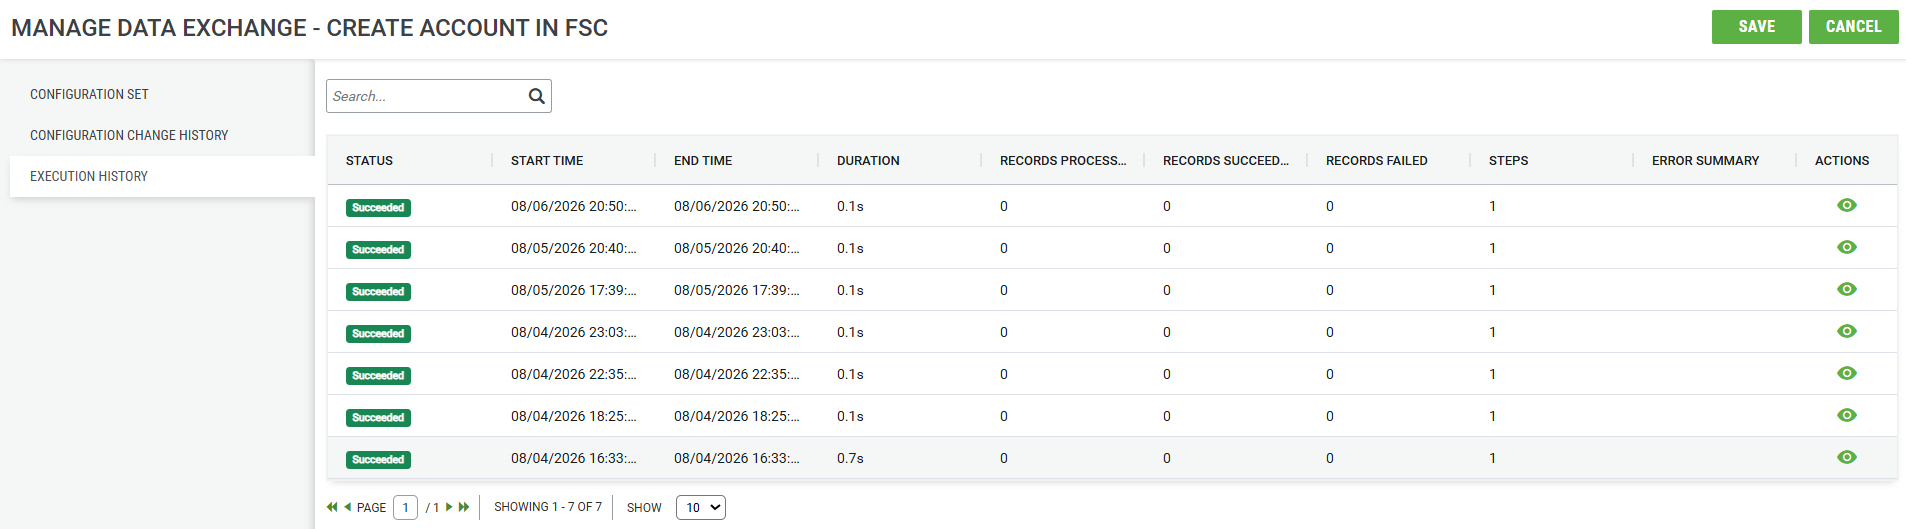
Validation Checklist
Before enabling a production data exchange, verify:
- Base Definition is complete.
- Scheduler Configuration is saved.
- Source connectivity test succeeds.
- Destination connectivity test succeeds.
- Mapping configuration is validated.
- Notification recipients are configured.
- Data exchange is enabled.
- A successful test execution has been completed.
Scheduling Data Exchange Configuration
Troubleshooting
Issue Resolution Connection test fails Verify server address, credentials, port numbers, and firewall access. Data exchange does not execute Ensure the exchange is enabled and the scheduler is configured correctly. Mapping errors occur Confirm source field names match the YAML mapping definition. Import records fail Verify Import Type configuration and destination mappings. Notification emails are not received Confirm store SMTP settings and recipient email addresses are valid.